Author: arino

  • Bonsai Wiring Tools and Supplies: The 6 Things You Need to Wire a Tree (and What to Skip)

    Bonsai Wiring Tools and Supplies: The 6 Things You Need to Wire a Tree (and What to Skip)

    Affiliate disclosure: Some links on this page are affiliate links. If you buy through them, Aribonsai may earn a small commission at no extra cost to you. It doesn’t change what we recommend or how we rank anything. Wazakura has also given us a discount code for readers, which we share below.


    Wiring looks simple until you try it

    Wiring is the technique that turns a bush into a bonsai. A coil of wire around a branch lets you bend it, hold it there for a few weeks or months, and set a new shape. It’s one of the first real skills every grower learns.

    Then you sit down to do it. You realize the wire you bought is the wrong thickness. Your kitchen scissors won’t cut it cleanly. Unwinding old wire tears off buds. And a branch you bent with confidence snaps at the base.

    Most wiring problems come down to two things: technique, and having the wrong supplies. Technique takes practice. The supplies part is easy to fix, and much cheaper than most people think.

    In my experience, beginners tend to overbuy in some areas and underbuy in others. They buy one big roll of a single thickness and no proper wire cutter, when what they really need is several small rolls and one good cutter.

    This guide covers the six things you need to wire a bonsai tree, from wire and cutters to raffia and a turntable, with clear picks at each step. It also covers what you can safely skip, and the basic technique to get started.


    Who this bonsai wiring supplies guide is NOT for

    It’s not a deep dive into any one product. We have separate guides for bonsai wire, wire cutters, jin pliers and raffia. This guide pulls them together into one kit.

    It’s not an advanced styling course. We cover the basics of technique, not advanced design.

    It’s not for heavy trunk bending. For that, you’ll need jacks or splitters, which we mention briefly at the end.

    Still with us? Let’s go.


    How we picked these (3 things that actually matter)

    1. Does it solve a real wiring problem?

    Every item here does a specific job: shaping branches, cutting wire safely, protecting branches during big bends, or making the work easier. No gadgets.

    2. The right size and gauge

    Wire is useless if it’s the wrong thickness. Tools are awkward if they’re the wrong size. Eastern Leaf’s wiring guide suggests wire about “1/3 the size of the branch,” and Bonsai4me gives the same one-third rule, noting that copper holds well at thinner gauges while aluminum needs to be thicker. For aluminum specifically, Eastern Leaf has suggested 1/3 to 1/2 the branch thickness.

    3. Value for a beginner kit

    Most wiring supplies are inexpensive. The one place it’s worth spending a little more is the wire cutter, because it protects the tree when you remove wire.

    A few wiring habits that matter more than the supplies

    None of these cost anything.

    • Let the tree dry out a little first. Eastern Leaf notes that freshly watered branches are more likely to break when bent, and suggests letting the tree dry for a day.
    • Wire at about 45 degrees. Both Eastern Leaf and Bonsai4me recommend roughly a 45-degree angle to the branch.
    • Anchor the wire well. Eastern Leaf suggests using one wire to hold two branches, anchored around the trunk.
    • Cut wire off, don’t unwind it. Bonsai4me says unwinding can dislodge buds, tear leaves or break branches.
    • Check for wire biting in. On fast-growing trees, check every few days.

    Bonsai wiring supplies comparison table

    ItemOur pickApprox. priceEssential?
    Aluminum wireEastern Leaf 500g rolls / Wazakura 150g rolls~$19.95 / ~$19.99Yes
    Copper wireWazakura annealed copper, 300g~$29.99Optional (conifers)
    Wire cutterWazakura Hand Forged Wire Cutter~$55.99Yes
    Jin pliersWazakura Wire & Jin Pliers~$45.99Very useful
    RaffiaNatural raffia (Bonsai Plaza, Herons, Bonsai Mirai)~€4.30–£5 per bundleFor big bends
    TurntableEastern Leaf 12″ round / Kaneshin KURUKURU~$65 / ~¥2,800Nice to have

    Prices are approximate, from when we checked between September and November, and change often. Use code ARIBONSAI for 10% off at Wazakura.


    The 6 bonsai wiring supplies, reviewed

    1. Aluminum wire – the essential starting point

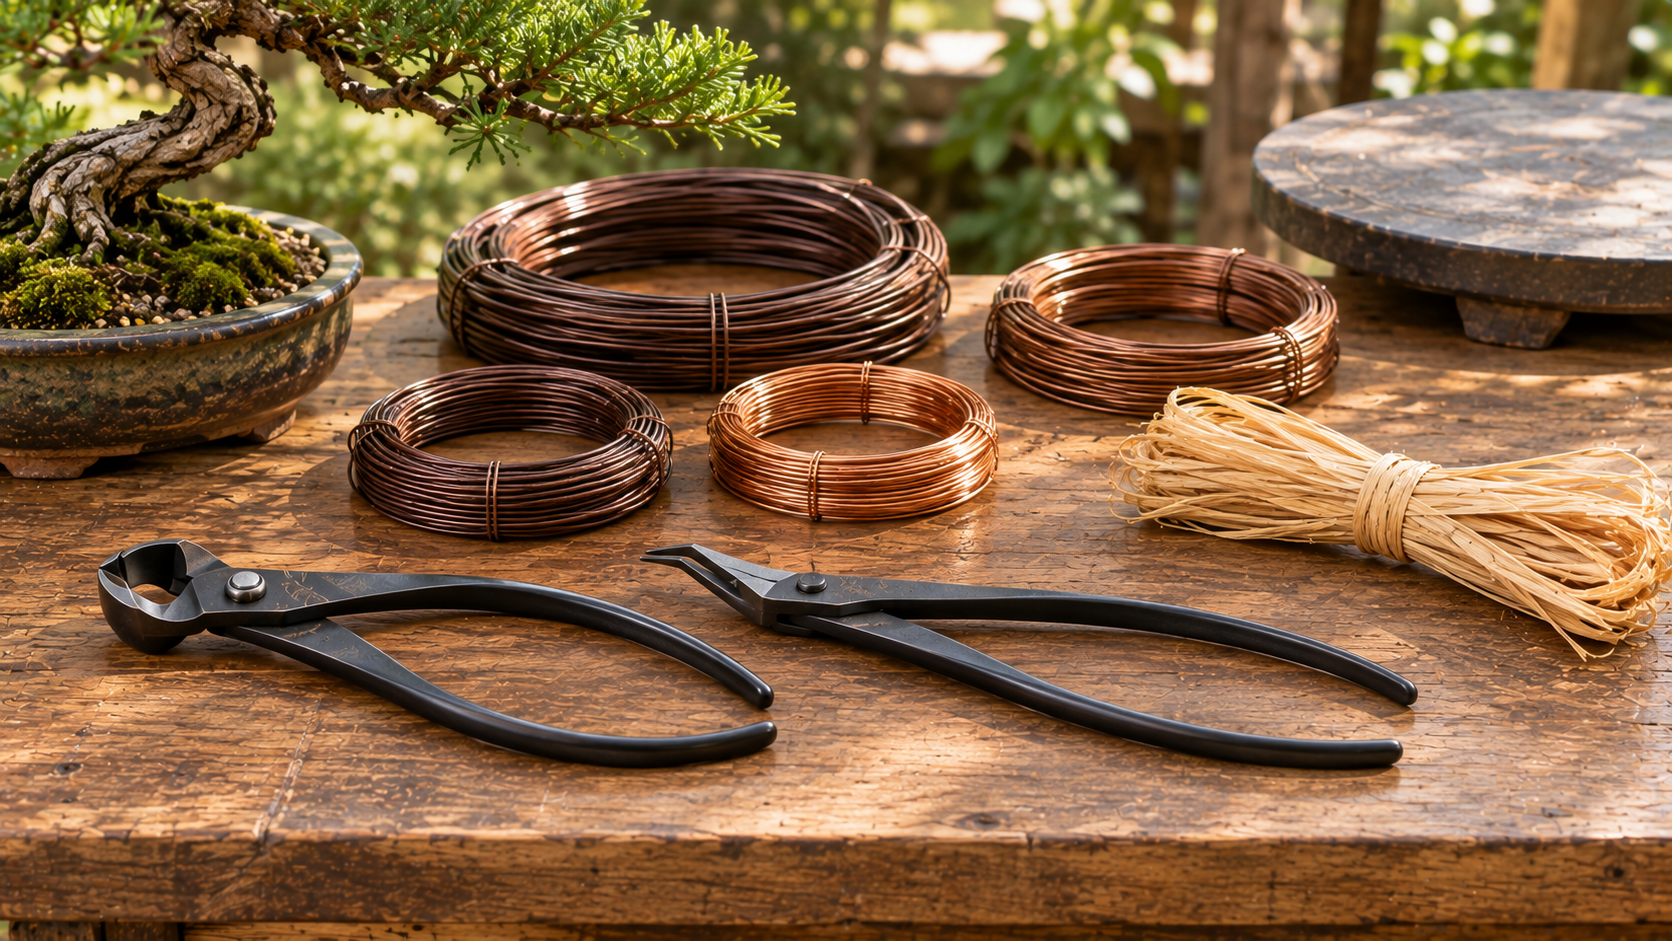
    Every grower should start with aluminum wire. It’s soft, easy to bend and forgiving if you need to reposition.

    Eastern Leaf aluminum wire comes in 500g rolls for $19.95 each, in sizes including 1.0mm, 1.5mm, 3.0mm, 3.5mm, 4.0mm and 4.5mm. The 1.5mm roll is about 350 feet. The listing states the country of origin as China. It’s good, inexpensive bulk wire for US buyers.

    Wazakura brown aluminum wire comes in 150g rolls for $19.99, in sizes from 1mm to 6mm, listed in Wazakura’s “Made in Japan” training wire collection. Brown blends in with bark, and smaller rolls are a good way to try several sizes. There’s also a black version.

    Bonsai4me suggests starting with 1mm, 1.5mm, 2.5mm and 4mm reels. That’s a sensible first set for most trees.

    Pros

    • Easy for beginners
    • Inexpensive
    • Can be repositioned

    Cons

    • Needs to be thicker than copper
    • Bulk rolls of one size can be wasteful

    Best for: everyone, especially beginners and deciduous trees.

    Check Eastern Leaf aluminum wire · Check Wazakura training wire


    2. Copper wire – for conifers, once you’re confident

    Copper holds more firmly than aluminum at thinner gauges, which is why it’s traditionally used on pines and junipers. Bonsai4me notes that copper holds more firmly but is harder to apply, and that it can’t be reused.

    Wazakura annealed copper wire is made by artisans in Sanjo, Niigata, according to the store. It comes in 1.2mm (about 95 feet per 300g) and 1.6mm (about 52.5 feet per 300g) at $29.99 per roll. Wazakura says it fades to a dull brown that blends with bark.

    Only two sizes are offered, both on the thin side, so it suits fine work on conifers.

    Pros

    • Holds well at thin gauges
    • Fades to a natural color
    • Japanese-made

    Cons

    • Harder for beginners
    • Not reusable
    • Only two sizes

    Best for: fine wiring on pines and junipers.

    Check Wazakura copper wire


    3. Wire cutter – the one tool worth paying for

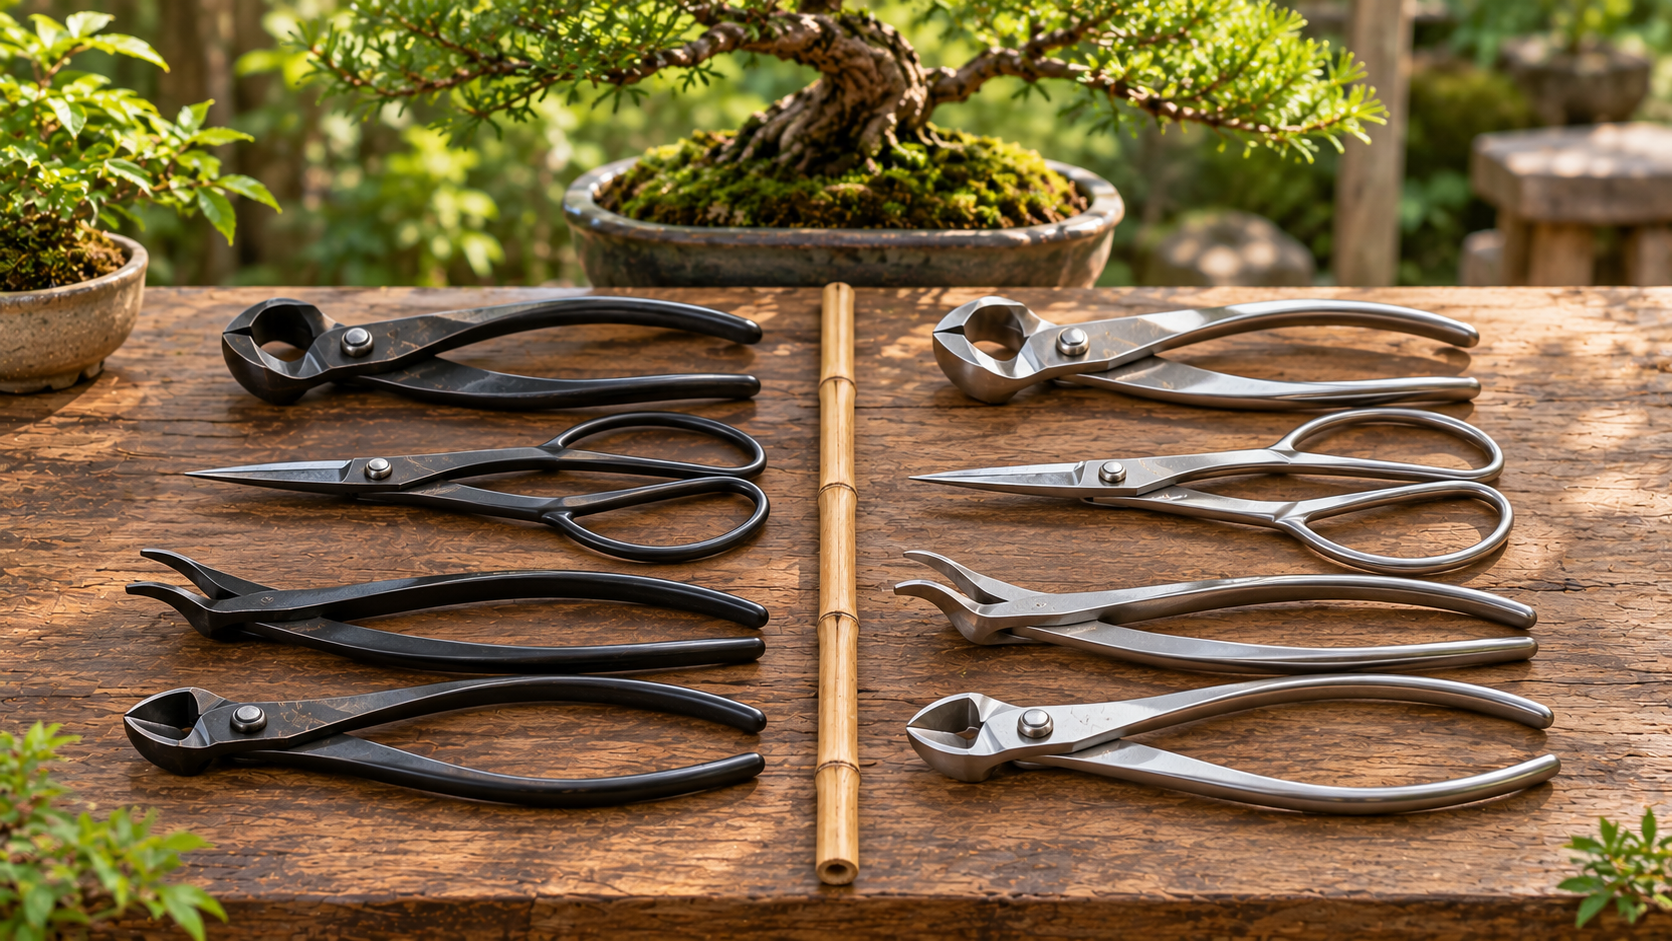
    A dedicated bonsai wire cutter is the most important wiring tool. It has rounded jaws that cut wire close to the bark without damaging it, which is essential when you remove wire turn by turn.

    Bonsai4me notes that ordinary wire cutters can work if you cut with the very ends of the jaws. But a proper bonsai wire cutter makes it much easier to avoid nicking the branch.

    Wazakura’s Hand Forged Bonsai Wire Cutter is S55C carbon steel with a black coating, 195mm long with a 12mm blade, 220g, at $55.99. Reviewers mention it handles up to roughly gauge 4 copper wire comfortably. It was the cheapest dedicated Japanese wire cutter in our wire cutter guide. If you want a well-known alternative, Bonsai Outlet lists Kaneshin’s No. 511 at $67.95.

    Pros

    • Protects bark when removing wire
    • Japanese-made at a fair price
    • Also sold as a set with pliers

    Cons

    • Carbon steel needs oiling
    • Only one size

    Best for: anyone who wires trees regularly.

    Check the Wazakura Wire Cutter


    4. Jin pliers – for tightening, unwinding and deadwood

    Jin pliers help you bend wire ends, tighten coils, pull wire into place and remove stubborn wire. They’re also used for stripping bark on deadwood.

    Wazakura’s Hand Forged Wire & Jin Pliers are S55C carbon steel with a black coating, 210mm long and 230g, for $45.99. Wazakura describes them as for shaping training wire, styling and safely removing wire, with rounded ends to protect the tree. Our jin pliers guide compares more options, including Kaneshin.

    Pros

    • Makes wiring neater and faster
    • Useful for deadwood work
    • Good all-round size

    Cons

    • Not strictly essential for your first wiring session
    • Carbon steel needs care

    Best for: anyone wiring more than a few trees.

    Check the Wazakura Wire & Jin Pliers


    5. Raffia – protection for bigger bends

    For ordinary branch wiring, you don’t need raffia. But for big bends on thick branches, it’s very helpful.

    Raffia is natural palm fiber. Bonsai Mirai notes that it provides compression and protection while still letting oxygen move through to the tree’s vascular system. Bonsai Plaza recommends soaking raffia for a couple of hours, wrapping it firmly in overlapping turns, and applying it before wire, clamps or guy wires, especially for heavy bending or older, thicker branches.

    Options include Bonsai Plaza natural raffia in 50g bundles for about €4.30, Herons natural raffia for about £5, and Bonsai Mirai raffia, which Mirai describes as the widest, longest and most consistent available. Our bonsai raffia guide covers all of these.

    Pros

    • Protects branches during big bends
    • Inexpensive
    • Breathable natural fiber

    Cons

    • Only needed for heavy bends
    • Needs soaking first

    Best for: bending thick or older branches.

    Check Natural Raffia at Bonsai Plaza


    6. Turntable – the comfort upgrade

    A turntable isn’t essential, but wiring involves working on every side of a tree. Being able to rotate it easily makes the job faster and more comfortable.

    Eastern Leaf sells a 12″ round turntable for $65, listed as made in Japan, rated for up to 150 lb and weather-resistant. In Japan, Kaneshin’s KURUKURU Circle Turntable No.1477 is about ¥2,800, 29.5cm across and rated for around 40–50kg, though international shipping on bulky items can add a lot.

    Pros

    • Makes wiring faster and easier
    • Doubles as a stand
    • Useful for rotating trees toward the sun

    Cons

    • Not essential
    • Shipping can be expensive from Japan

    Best for: growers who wire regularly or have larger trees.

    Search bonsai turntables on Amazon


    Which wiring supplies should you buy? (By situation)

    You’re wiring for the first time: aluminum wire in three or four sizes, plus a wire cutter.

    You’ve wired a few trees and want to be neater: add jin pliers.

    You grow pines or junipers: add copper wire once you’re comfortable.

    You’re making big bends on thick branches: add raffia.

    You wire a lot of trees: add a turntable.

    A simple starter kit

    • Aluminum wire: 1mm, 1.5mm, 2.5mm and 4mm
    • Wazakura Wire Cutter ($55.99)
    • Wazakura Wire & Jin Pliers ($45.99)

    That’s a complete, practical wiring kit. With the ARIBONSAI code, you get 10% off the Wazakura tools and wire.


    What you can skip

    Huge rolls of one size. You’ll need several sizes, not a kilogram of one.

    Cheap plastic-handled “bonsai kits.” The wire cutters in them often don’t cut cleanly.

    Copper wire as a beginner. Start with aluminum.

    Raffia for everyday wiring. It’s only needed for heavy bends.


    Basic wiring technique in 7 steps

    1. Let the tree dry slightly for a day before wiring, as Eastern Leaf suggests, so branches are less brittle.
    2. Choose wire about one-third the thickness of the branch.
    3. Anchor the wire around the trunk, or use one wire for two branches.
    4. Wrap at about 45 degrees, from the base of the branch to the tip.
    5. Finish with a final turn, leaving the end pointing up so the wire doesn’t slip.
    6. Bend gently to the new position.
    7. Check regularly, and cut off the wire before it bites in.

    How long to leave wire on

    It depends on the tree and the season. Bonsai4me says deciduous branches wired in spring or summer may set in two to three weeks, while autumn or winter wiring can take months, and conifers often need wire over winter. Eastern Leaf says that after a few months the wire sets and can be removed, and sooner if the tree grows around the wire.


    A quick wire size guide

    Using the one-third rule as a starting point, here’s roughly what that looks like in practice:

    Branch thicknessWire (about 1/3)
    3mm1mm
    4.5mm1.5mm
    7.5mm2.5mm
    12mm4mm

    These match the 1mm, 1.5mm, 2.5mm and 4mm starter set Bonsai4me suggests. Remember that aluminum may need to be a little thicker than this, and copper can often be a little thinner. The real test is simple: if the branch springs back after you bend it, go up a size.

    When to wire

    Timing matters as much as the supplies. Bonsai4me suggests:

    • Deciduous trees: autumn after leaf fall works well in warmer climates, as does midsummer after defoliation.
    • Conifers: late midsummer to early autumn.
    • Winter: protect wired trees from frost below about -10°C.

    It also notes a practical point about anchoring: the author avoids anchoring wire into the soil and roots, since the wire can loosen and disturb them, and keeps the coil above the soil unless the base of the trunk needs to move.

    In my experience, the best time to wire is simply when you have an unhurried hour. Rushed wiring is where most broken branches come from.


    When you need more than wire

    Some branches and trunks are too thick for wire alone. For those, growers use bending jacks, trunk splitters and guy wires. For example, Bonsai Tonight sells the Kikuwa Bonsai Jack (small) at around $125. Our bonsai branch bender guide covers these tools.


    Common wiring mistakes

    Using wire that’s too thin. The branch won’t hold.

    Wiring right after watering. Branches are more likely to snap.

    Unwinding wire instead of cutting it. It can damage buds and bark.

    Leaving wire on too long. It can bite in and scar the branch.

    Crossing wires. Plan the route to keep it neat.

    Buying only one wire size. Different branches need different thicknesses, so a few small rolls beat one big one.

    Skipping the wire cutter. Kitchen scissors and household pliers make it much harder to remove wire without damaging the bark.


    Conclusion: a small kit goes a long way

    You don’t need much to wire a bonsai well. A few sizes of aluminum wire and a proper wire cutter cover the essentials. Jin pliers make the work neater, copper suits conifers once you’re confident, raffia protects big bends, and a turntable makes everything more comfortable.

    Start small, wire at about 45 degrees, check often, and cut the wire off before it bites in.

    Ready to start wiring? Shop Wazakura wiring tools and wire → and use code ARIBONSAI for 10% off, or check the Wazakura Wire Cutter →.
  • Wazakura vs Kaneshin: Which Japanese Bonsai Tools Are Worth Your Money, Tool by Tool

    Wazakura vs Kaneshin: Which Japanese Bonsai Tools Are Worth Your Money, Tool by Tool

    Affiliate disclosure: Some links on this page are affiliate links. If you buy through them, Aribonsai may earn a small commission at no extra cost to you. It doesn’t change what we recommend or how we rank anything. Wazakura has also given us a discount code for readers, which we share below.


    Two Japanese brands, one budget

    Once you’ve decided to buy proper Japanese bonsai tools, the choice often comes down to two names.

    Kaneshin is the brand everyone recommends. It’s been around for over a century, it’s stocked by bonsai shops across the US and Europe, and nearly every forum thread about tools mentions it.

    Wazakura is the newer name. Its tools are made by workshops in Sanjo and Miki, two of Japan’s best-known metalworking towns, and they’re usually cheaper. But there’s less history to go on.

    So which one should you buy? The honest answer is that it depends on the tool. In some categories, the gap between them is small and Wazakura’s lower price wins. In others, Kaneshin’s wider range of sizes and steels is worth paying for.

    In my experience, the most useful way to compare brands is tool by tool, not brand by brand. That’s what this guide does. It puts Wazakura and Kaneshin side by side for six common bonsai tools, with prices, sizes and a clear verdict for each.


    Who this Wazakura vs Kaneshin guide is NOT for

    It’s not about premium collector tools. If you’re deciding between Kaneshin and Masakuni, our Kaneshin vs Masakuni comparison covers that.

    It’s not for people who only want stainless steel. Most Wazakura cutters are carbon steel, so the comparison is mainly carbon vs carbon.

    It’s not for budget tool sets. Both brands are proper Japanese tools. If you want a full set for under $50, neither fits.

    Still with us? Let’s go.


    How we compared them (3 things that actually matter)

    1. Price for the same job

    We compared Wazakura’s own store prices with Kaneshin prices from Bonsai Outlet, a US bonsai retailer. That keeps things fair: both are prices a US buyer could actually pay. Wazakura offers free shipping to the US, Canada, the UK, the EU and some other regions, though import tax may still apply.

    On Bonsai Nut, one member puts standard-steel Wazakura tools at about $30 to $45, with stainless versions about $20 to $30 more.

    2. Range of sizes and steels

    This is Kaneshin’s biggest advantage. Kaneshin sells many tools in several sizes and steel grades: plain carbon, traditional white and blue steel, plated finishes and stainless. Wazakura mostly offers one size of each tool, usually in carbon steel. Our stainless vs carbon steel guide explains why that matters.

    3. Track record and availability

    Kaneshin is listed among Gifu Prefecture’s cutlery makers, and several retailers describe it as handcrafting tools in Japan since 1919. It has decades of forum feedback. One long-time owner on Bonsai Nut feels quality has slipped “a little bit” over the years, but it remains widely recommended.

    Wazakura says its cutters are made at a Sanjo workshop founded in 1912, run by a third-generation family of blacksmiths. But the brand itself has a much shorter track record in the West, and its stock sells out often. Early feedback is positive; one new buyer on Bonsai Nut noted that Wazakura’s concave cutters meet very tightly.

    A few habits that matter more than the brand

    None of these cost anything.

    • Oil carbon steel after use. Both brands’ carbon tools will rust if left wet.
    • Stay within each tool’s cutting range. Forcing a cutter damages any brand.
    • Use the right tool for the job. Don’t cut wire with shears.
    • Buy the tools you’ll actually use first. A concave cutter and scissors cover most early work.

    Wazakura vs Kaneshin comparison table

    ToolWazakuraKaneshin (Bonsai Outlet)Price gapVerdict
    Concave cutter200mm, 190g, $59.99No. 3a, $74.95~$15Wazakura for value
    Knob cutter210mm, 230g, $59.99No. 11 (210mm, ~250g), $64.95~$5Close; Kaneshin for sizes
    Wire cutter195mm, 220g, $55.99No. 511 (200mm, 260g), $67.95~$12Wazakura for value
    Jin pliers210mm, 230g, $45.99No. 48A (180mm), $54.95~$9Depends on size
    ScissorsSatsuki 180mm, 84g, $39.99No. 40E, $64.95~$25Wazakura for value
    Root cutter210mm, 274g, $59.99210mm carbon, 370g+—Wazakura for weight

    Wazakura prices are from its own store; Kaneshin prices are from Bonsai Outlet. Both were checked between September and November and may change. Many Wazakura items sell out, so check stock. Use code ARIBONSAI for 10% off at Wazakura.


    Wazakura vs Kaneshin, tool by tool

    1. Concave cutter – Wazakura for value

    The concave cutter is the most important tool for structural pruning, so it’s where many people start.

    Wazakura: The Hand Forged Concave Branch Cutter is S55C carbon steel with a black coating, 200mm long with 25mm blades, 190g, and cuts branches of about 8–13mm. It’s $59.99, though it was sold out when we checked in November.

    Kaneshin: Bonsai Outlet lists the No. 3a concave cutter at $74.95. Kaneshin also makes concave cutters in several sizes, a spherical version, and stainless models such as the No. 802, which costs roughly double the carbon version.

    Verdict: For a first concave cutter, Wazakura offers Japanese quality for about $15 less. If you want a specific size, a spherical jaw or stainless steel, Kaneshin has the options. Our concave cutter guide compares both in more detail.

    Wazakura pros: lower price, light, free shipping to several regions. Kaneshin pros: more sizes, stainless and spherical options, easy to buy locally.

    Check the Wazakura Concave Cutter →


    2. Knob cutter – close, but Kaneshin wins on choice

    Knob cutters remove stubs and knobs, leaving a hollow that heals flat.

    Wazakura: The Hand Forged Knob Cutter is S55C carbon steel with a black coating, 210mm long with a 15mm blade, 230g, at $59.99. There’s also an asymmetrical-handle version at the same price, which Wazakura says gives a more balanced grip.

    Kaneshin: Bonsai Outlet lists the No. 11 knob cutter at $64.95. Kaneshin’s carbon knob cutters come in 150mm (No. 9), 175mm (No. 10) and 210mm (No. 11), with thinner-bladed “B” versions and stainless models too. The No. 11 weighs around 250g.

    Verdict: At 210mm, the two are very close in price and weight. But Wazakura only offers one size, and 210mm is on the large side for shohin. If you want a smaller knob cutter, Kaneshin is the choice.

    Wazakura pros: slightly cheaper, asymmetrical handle option. Kaneshin pros: three sizes, thinner-bladed and stainless versions.

    Check the Wazakura Knob Cutter →


    3. Wire cutter – Wazakura for value

    A proper wire cutter cuts wire close to the bark without damaging it.

    Wazakura: The Hand Forged Wire Cutter is S55C carbon steel with a black coating, 195mm long with a 12mm blade, 220g, at $55.99. Reviewers mention it handles up to roughly gauge 4 copper wire comfortably, though Wazakura doesn’t state an official capacity. It’s also sold in a set with pliers.

    Kaneshin: Bonsai Outlet lists the No. 511 wire cutter at $67.95. It’s 200mm and 260g. Kaneshin also offers smaller carbon wire cutters (down to a compact 120mm No. 18) and stainless models such as the No. 814 and No. 815.

    Verdict: For an all-round wire cutter, Wazakura is about $12 cheaper and slightly lighter. If you need a small cutter for fine wire on shohin, or stainless steel, Kaneshin’s range is better. More in our wire cutter guide.

    Wazakura pros: lower price, lighter, set with pliers available. Kaneshin pros: many sizes, stainless options.

    Check the Wazakura Wire Cutter →


    4. Jin pliers – depends on the size you want

    Jin pliers are used for applying and removing wire, and for stripping bark on deadwood.

    Wazakura: The Hand Forged Wire & Jin Pliers are S55C carbon steel with a black coating, 210mm long and 230g, at $45.99. The ends are rounded to protect the tree, and the handles are designed to reduce hand fatigue.

    Kaneshin: Bonsai Outlet lists the No. 48A jin pliers at $54.95. Kaneshin’s pliers come in several sizes, including the 180mm No. 48A and the long-handled 230mm No. 49, plus stainless No. 818 (180mm) and No. 819 (215mm).

    Verdict: Wazakura’s 210mm pair is a good all-round size at a lower price. Kaneshin’s range lets you choose a shorter pair for small trees or a long-handled pair for extra leverage.

    Wazakura pros: lower price, good middle size. Kaneshin pros: short, long and stainless options.

    Check the Wazakura Wire & Jin Pliers →


    5. Scissors – Wazakura for value, Kaneshin for variety

    Scissors are the tool you’ll use most often.

    Wazakura: The Satsuki Bonsai Scissors are S58C black carbon steel, 180mm with a 40mm blade, and very light at 84g, for $39.99. A Yasugi Steel version (YCS3, 103g) costs $45.99.

    Kaneshin: Bonsai Outlet lists Kaneshin Bonsai Shears (No. 40E) at $64.95, Bud Shears (No. 34G) at $64.95 and Bowed Shears (No. 36D) at $94.95. Kaneshin offers many shapes and steels.

    Verdict: Wazakura’s scissors are about $25 cheaper and among the lightest Japanese scissors we’ve seen. Kaneshin offers far more shapes, which matters if you want a specific style of shear. Our bonsai shears guide covers both.

    Wazakura pros: much cheaper, very light, Yasugi upgrade for about $6 more. Kaneshin pros: many shapes and steels, easy to buy locally.

    Check the Wazakura Satsuki Bonsai Scissors →


    6. Root cutter – Wazakura for weight

    A root cutter makes repotting easier and doubles as a heavy-duty cutter.

    Wazakura: The Hand Forged Root Cutter is S55C carbon steel with a black coating, 210mm (225mm overall) and 274g, at $59.99. Wazakura describes it as for root pruning, thick branches and splitting thinner trunks.

    Kaneshin: Kaneshin’s 210mm carbon root cutter weighs 370g or more, and the brand also offers other sizes and stainless versions.

    Verdict: Wazakura’s root cutter is noticeably lighter, which helps on long repotting days. Kaneshin offers more sizes and stainless options, which suit wet, gritty root work.

    Wazakura pros: much lighter, low price. Kaneshin pros: more sizes, stainless available.

    Check the Wazakura Root Cutter →


    What about tool sets?

    Both brands sell sets, but they’re aimed at different people.

    Wazakura 3PCS Starter Kit ($69.99): satsuki scissors, stainless tweezers with a rake end and a bonsai broom. It’s for trimming and tidying, with no branch cutter. Good for beginners and gifts.

    Kaneshin 8-Piece Tool Set with Case ($379.95 at Bonsai Outlet): a complete set for serious growers, with a case.

    If you’re new, the Wazakura kit plus a concave cutter is a much cheaper start. If you want a full, matched set from one brand, Kaneshin’s is the more complete option. Our bonsai starter tool sets guide compares more options.


    What the price gap looks like across a real kit

    Single-tool differences of $5 to $25 don’t sound like much. But most growers end up buying several tools, so it’s worth adding them up. Using the prices in our table:

    KitWazakuraWazakura with ARIBONSAI (10% off)Kaneshin (Bonsai Outlet)
    Starter pair (concave cutter + scissors)$99.98~$89.98$139.90
    Wiring pair (wire cutter + jin pliers)$101.98~$91.78$122.90
    Core five (concave, knob, wire cutter, jin pliers, scissors)$261.95~$235.76$327.75

    Totals are before any shipping or import tax. Wazakura offers free shipping to several regions; Bonsai Outlet’s shipping costs depend on your order.

    For the core five tools, the difference is roughly $65 before the discount code, and over $90 with it. That’s enough to buy a good root cutter or a handmade pot.

    On the other hand, the Kaneshin kit gives you more choice: you could swap any of those tools for a different size or a stainless version, which you can’t do with Wazakura.


    Which brand should you buy? (By situation)

    You’re buying your first Japanese tools: Wazakura. The lower prices make it easier to start.

    You want one tool of each type at a fair price: Wazakura.

    You want a specific size, especially for shohin: Kaneshin.

    You want stainless steel: Kaneshin.

    You want to buy locally with easy returns: Kaneshin, which is widely stocked in the US.

    You want the longest track record: Kaneshin.

    You do long sessions and want lighter tools: Wazakura, especially for scissors and root cutters.

    Mixing brands is completely normal

    You don’t have to pick one. A sensible combination is Wazakura for scissors, wire cutter and jin pliers, where it’s cheaper and lighter, and Kaneshin for a stainless or smaller tool where you need a specific size or steel.


    Buying tips for each brand

    Wazakura:

    • Use code ARIBONSAI for 10% off.
    • Check stock; popular tools sell out.
    • Look at bundles, like the wire cutter and pliers set.
    • Check import tax for your country.

    Kaneshin:

    • Check model numbers carefully; they can be confusing across shops.
    • Compare US retailer prices with Japanese export stores.
    • Decide on carbon or stainless before you buy.

    Quick answers to common questions

    Is Wazakura really made in Japan? Its core cutters are listed as made in Sanjo, Niigata, and its saw and chisel kit in Miki, Hyogo. One soil sieve set has been listed by a US retailer as made in China for Wazakura, so check the listing for non-cutting items.

    Is Kaneshin better quality? It has a much longer track record and more options. Wazakura is newer, so there’s simply less long-term feedback to judge it by yet.

    Can I buy Wazakura locally? Mostly through its own store and Amazon, with free shipping to several regions.


    Common mistakes when comparing tool brands

    Comparing only the brand name. Size and steel matter just as much.

    Assuming the more expensive tool is always better for you. The extra cost may buy options you don’t need.

    Ignoring weight. A lighter tool can make a big difference on long sessions.

    Forgetting maintenance. Carbon steel needs oiling, whichever brand you choose.


    Conclusion: Wazakura for value, Kaneshin for choice

    Wazakura and Kaneshin are both genuine Japanese tool brands, and both will make cleaner cuts than a cheap set.

    Wazakura is the better value in most categories: concave cutters, wire cutters, scissors and jin pliers all cost less, and several of its tools are lighter. Its trade-offs are a shorter track record, mostly one size of each tool, mostly carbon steel and frequent sell-outs.

    Kaneshin costs more, but gives you a wider range of sizes and steels, decades of feedback and easy local availability.

    For most hobbyists buying their first proper tools, Wazakura is the smarter starting point. As your needs get more specific, adding a Kaneshin tool or two makes a lot of sense.

    Ready to choose? Shop Wazakura bonsai tools → and use code ARIBONSAI for 10% off, or check Kaneshin at Bonsai Outlet →.

  • How to Sharpen Bonsai Tools: 6 Stones That Work and the Right Technique for Each Tool

    How to Sharpen Bonsai Tools: 6 Stones That Work and the Right Technique for Each Tool

    Affiliate disclosure: Some links on this page are affiliate links. If you buy through them, Aribonsai may earn a small commission at no extra cost to you. It doesn’t change what we recommend or how we rank anything.


    Your tools aren’t broken. They’re just dull.

    It happens slowly. Your scissors start folding soft shoots instead of slicing them. Your concave cutter needs a second squeeze to get through a branch it used to cut cleanly. The wounds look a little rougher than they used to.

    Most people assume they need new tools. Usually, they don’t. They need to sharpen the ones they have.

    The problem is that bonsai tools are harder to sharpen than kitchen knives. Scissors have a flat back that must stay flat. Concave cutters have curved blades that a flat stone can’t reach. And it’s easy to make things worse by grinding the wrong side, or taking off far more metal than needed.

    In my experience, the people who are nervous about sharpening are often the ones who’d be best at it, because they go slowly. You don’t need a workshop or a dozen stones. You need one or two of the right stones, a black marker and a bit of patience.

    This guide covers six sharpening stones that suit bonsai tools, how to sharpen each type of tool, and when it’s better to send your tools to a professional.


    Who this bonsai tool sharpening guide is NOT for

    It’s not about cleaning and oiling. For rust prevention, sap removal and everyday care, see our bonsai tool maintenance guide.

    It’s not for badly damaged tools. If a blade is bent, cracked or has a large chip, a professional sharpener is a safer bet.

    It’s not a knife sharpening guide. Many of the principles are the same, but bonsai tools have their own quirks.

    Still with us? Let’s go.


    How we picked these (3 things that actually matter)

    1. The right grit for the job

    Sharpening stones are rated by grit. Low numbers are coarse and remove metal quickly; high numbers are fine and polish the edge.

    Bonsai Tonight’s Jonas Dupuich, in his guide to basic tool care, suggests:

    • About 400–600 grit for repairing a broken, bent or damaged tip.
    • About 1,000–1,200 grit for regular sharpening.
    • About 6,000–8,000 grit for polishing. He notes polishing isn’t always necessary, but he finds the edge “holds better.”

    Bonsai Outlet’s sharpening guide uses a similar idea with a 280/1500 combination stone: coarse for dull or nicked edges, fine for finishing.

    2. The right shape for the blade

    This is where bonsai tools differ from kitchen knives. Scissors and shears have straight bevels, so a flat stone works. Concave and knob cutters have curved blades. Bonsai Outlet warns against using a flat stone on the inside of a concave cutter, and recommends a cylindrical stone that fits the curve instead. Dupuich says he uses cylinders, gouged blocks and small stones for concave cutters, and works slowly.

    3. Water stone, oil stone or diamond

    Dupuich prefers water stones because they’re “simple and easy to use,” though oil and diamond stones are also options. One commenter on his post switched to diamond-coated files, which cost more but were easier to use.

    Whatever you choose, stick with it. Bonsai Tonight’s small sharpening stones, for example, can be used with water or oil, but not both.

    A few sharpening habits that matter more than the stone

    None of these cost anything.

    • Keep the original bevel angle. Don’t invent a new one.
    • Remove as little metal as possible. Check your progress often.
    • Never grind the flat back of scissors. Only remove the burr with a few light, flat strokes.
    • Keep water stones wet. Soak them before use and keep water on the surface.
    • Oil the tool afterwards. Freshly sharpened carbon steel rusts easily.

    Bonsai sharpening stones comparison table

    StoneGritShapeBest forApprox. price
    1000/6000 combination water stone1000 / 6000FlatScissors and shears, polishingVaries by brand
    250/1000 combination whetstone250 / 1000FlatRepairing dull or nicked edges~$24.95
    Naniwa GOKEN curved-blade stone#1000Convex, concave and flat facesCurved and straight blades~£9
    Okatsune Curved Edge Sharpening StoneNot listedCurved edge + flat surfaceConcave cutters and shears~$19.95
    Bonsai Tonight Small Sharpening Stone240 or 320Small, narrowConcave cutters and tight spots~$35
    Diamond filesVariesSmall, various shapesQuick touch-upsVaries

    Prices are approximate, from when we checked, and vary by retailer. Always check current prices.


    The 6 best sharpening stones for bonsai tools, reviewed

    1. 1000/6000 combination water stone – the all-round starting point

    If you only buy one stone, a 1000/6000 combination water stone covers most regular sharpening.

    The 1,000 side handles everyday sharpening, and the 6,000 side polishes the edge, which matches Dupuich’s suggested ranges almost exactly. Combination stones like the King 1000/6000 are widely sold by Japanese knife and woodworking retailers.

    This stone suits scissors, shears and other straight-bladed tools. It won’t reach inside a concave cutter.

    Pros

    • Covers regular sharpening and polishing
    • Widely available
    • Works for many other tools in the house

    Cons

    • Flat, so not for the inside of concave cutters
    • Not coarse enough for repairing damage

    Best for: anyone starting to sharpen their own scissors and shears.

    Search 1000/6000 combination whetstones on Amazon


    2. 250/1000 combination whetstone – for repairing dull or damaged edges

    If your tools are very dull or have small nicks, you’ll need a coarser stone first.

    Eastern Leaf sells a Japanese combination whetstone with a 250-grit side and a 1,000-grit side for $24.95. The coarse side is for repairing a damaged or very dull edge; the fine side is for regular sharpening. Bonsai Outlet’s guide uses a similar 280/1500 stone, starting on the coarse side for dull or nicked edges, then finishing on the fine side with fewer strokes.

    Pros

    • Coarse side for repair work
    • Affordable
    • Two grits in one stone

    Cons

    • Coarse grit removes metal quickly, so go carefully
    • Flat, so limited for curved blades

    Best for: tools that have been neglected or slightly damaged.

    Check the combination whetstone at Eastern Leaf


    3. Naniwa GOKEN curved-blade whetstone #1000 – three shapes in one stone

    This small stone from Japanese abrasives maker Naniwa is designed specifically for garden tools with curved blades.

    Japanese retailer amenoma lists the GOKEN Medium Whetstone #1000 for Gardening Tools at £9. It’s 133mm long, 28mm wide and 20mm high, weighs about 135g, and has three working faces: a convex side for curved cutting edges, a concave side for clam-shaped blades and a flat side for straight blades.

    The instructions are clear and useful for bonsai scissors: sharpen only the front of the blade and remove the burr, and avoid grinding the back of the blades, since that can open them so they no longer meet.

    Pros

    • Three shapes in one small stone
    • Very affordable
    • Japanese maker with clear instructions

    Cons

    • Only #1000 grit
    • Was backordered when we checked

    Best for: growers who want one small stone for several blade shapes.

    Check the Naniwa GOKEN curved-blade stone at amenoma


    4. Okatsune Curved Edge Sharpening Stone – easy to hold for concave cutters

    Okatsune is better known for garden shears, but its sharpening stone is popular with bonsai growers too.

    The Okatsune Curved Edge Sharpening Stone is a hand-sized stone with one curved edge and one flat surface. A Stone Lantern listing we checked priced it at $19.95, and described the curved edge as being for concave cutters and other curved blades, and the flat side for flat-bladed tools. The grit isn’t listed.

    Because you hold it in your hand and bring it to the tool, it’s easier to control on curved blades than a bench stone.

    Pros

    • Curved edge for concave cutters
    • Flat side for shears
    • Easy to hold and control

    Cons

    • Grit not stated
    • One grit only

    Best for: sharpening concave cutters without a full stone set.

    Search Okatsune sharpening stone on Amazon


    5. Bonsai Tonight Small Sharpening Stone – made for concave cutters

    Bonsai Tonight sells a small sharpening stone specifically for bonsai tools, especially concave cutters and other tools that need smaller stones.

    It’s made in Japan, measures 7¾ × 1 inch and comes in coarse (240 grit) or fine (320 grit), for $35. It can be used with water or oil, but not both, so choose one at first use and stick with it.

    Its narrow shape is what makes it useful. It fits into tight spaces that larger stones can’t reach.

    Pros

    • Made in Japan
    • Narrow shape suits concave cutters
    • Coarse or fine options

    Cons

    • Both grits are relatively coarse, so not for polishing
    • More expensive than other small stones

    Best for: growers who regularly sharpen concave and knob cutters.

    Check the Small Sharpening Stone at Bonsai Tonight


    6. Diamond files – the quick touch-up option

    Diamond files are small, metal files coated with diamond abrasive. They don’t need soaking, and they come in shapes, including round and half-round, that fit curved blades.

    A commenter on Bonsai Tonight’s tool care post says they switched to diamond-coated files from a kitchenware shop, finding them more expensive but easier to use. On Bonsai Nut, one poster also mentions a tungsten carbide sharpener for quick clean-up on tools that still have a decent edge.

    They’re best for touch-ups rather than full sharpening.

    Pros

    • No soaking needed
    • Small shapes fit curved blades
    • Quick for touch-ups

    Cons

    • Easy to remove too much metal
    • Not ideal for polishing

    Best for: quick touch-ups between full sharpening sessions.

    Search diamond needle files on Amazon


    Which sharpening stone should you buy? (By situation)

    You mainly want to sharpen scissors and shears: a 1000/6000 combination water stone.

    Your tools are very dull or slightly nicked: a 250/1000 combination whetstone.

    You want one small stone for several blade shapes: the Naniwa GOKEN curved-blade stone.

    You mainly sharpen concave cutters: the Okatsune stone or Bonsai Tonight’s small stone.

    You want quick touch-ups: diamond files.

    A good starter kit: a 1000/6000 stone for scissors plus one curved stone for cutters.


    How to sharpen each type of bonsai tool

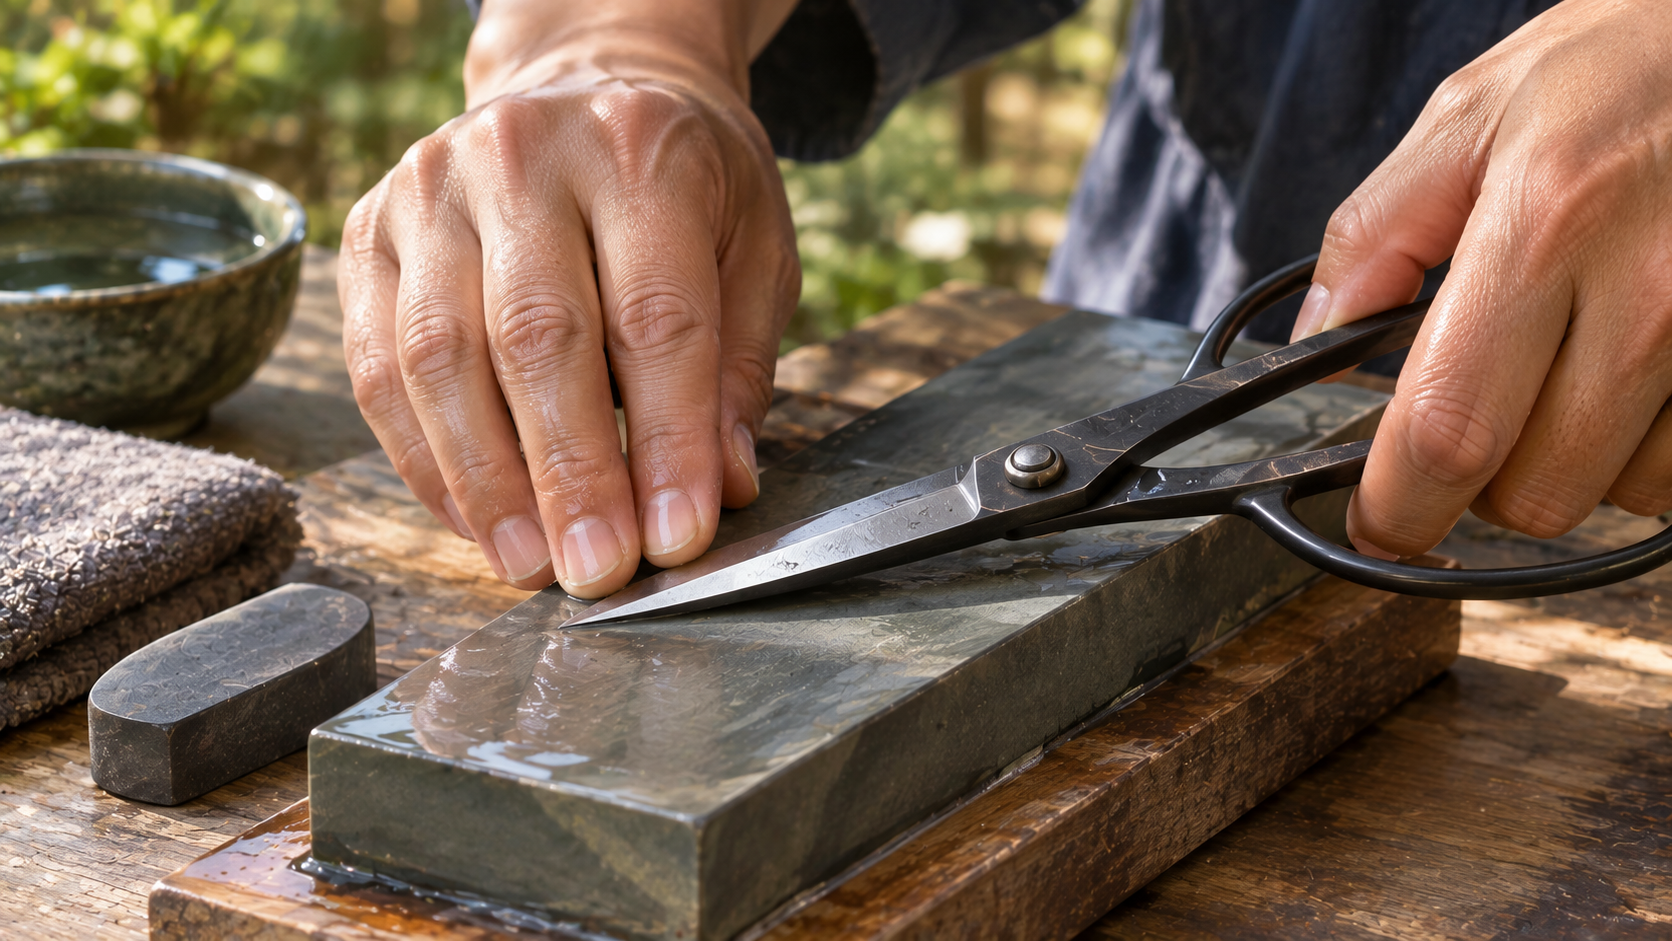
    Before you start, gather a few simple things: your stone, a bowl of water for soaking, a black permanent marker, an old towel to work on, a clean cloth and tool oil for afterwards. Work somewhere with good light, so you can see the edge clearly.

    Scissors and shears

    Bonsai Outlet’s guide gives a clear method:

    1. Open the blades fully and color the bevel with a black marker.
    2. Soak the stone and keep it wet throughout.
    3. Start on the coarse side if the edge is dull or nicked, using smooth, consistent strokes. Match the number of strokes on both blades.
    4. Polish on the fine side with fewer strokes.
    5. Check the marker. If it’s removed along the whole bevel, your angle is right. If only at the tip, the angle is too high. If only at the base, it’s too low.
    6. Remove the burr by laying the flat back nearly flat on the fine stone and making a few light strokes. Don’t raise the back.
    7. Test with a light thumb pass across the edge, not along it, or by cutting paper.

    Bonsai Outlet notes the bevel is typically around 30 degrees, and stresses keeping the existing angle. Our bonsai shears guide covers the scissors themselves.

    Concave and knob cutters

    These are the hardest to sharpen.

    1. Use a cylindrical or curved stone that fits the inside curve. Don’t use a flat stone on the interior.
    2. Sharpen the inside gently, removing as little material as possible.
    3. Lightly finish the outside flat face to remove the burr.

    Dupuich describes using cylinders, gouged blocks and small stones, and working slowly. On bonsai forums, even experienced growers admit they find concave cutters tricky, so don’t rush. If you’re unsure, practice on an inexpensive cutter first. Our concave cutter guide and knob cutter guide cover these tools.

    Wire cutters and jin pliers

    Most sharpening guides we found don’t give detailed instructions for these. Wire cutters have short, symmetrical jaws, and getting both edges to meet perfectly is difficult at home. Unless you’re confident, these are good candidates for a professional sharpener.


    When to use a professional sharpening service

    Sometimes it’s simply better to send tools out.

    On Bonsai Nut, one poster says a bonsai Facebook group recommended Bruce’s Sharpening Service in Pennsylvania, and suggests that most reputable local tool sharpening services or bonsai professionals can do the job well, as long as you ask them to keep the original bevel angle. The same poster suggests calling bonsai shops to ask whether they sharpen in-house or send tools out.

    Consider a professional if:

    • A blade is chipped, bent or badly damaged.
    • You have expensive tools like Masakuni and don’t want to risk them.
    • You need wire cutters or jin pliers sharpened.
    • You simply don’t have the time.

    How often should you sharpen bonsai tools?

    There’s no fixed schedule. Dupuich sharpens tools “when they dull.” Signs it’s time include:

    • Scissors folding or crushing soft shoots.
    • Needing extra force to cut.
    • Rough or torn cut surfaces.
    • Small visible nicks on the edge.

    Regular cleaning and oiling make a big difference to how often you need to sharpen. Steel type matters too; our stainless vs carbon steel guide explains the differences.


    Common bonsai tool sharpening mistakes

    Grinding the flat back of scissors. This can stop the blades meeting.

    Using a flat stone inside a concave cutter. It can’t follow the curve.

    Changing the bevel angle. Keep the original angle.

    Removing too much metal. Check often and go slowly.

    Starting with the coarsest stone every time. Only use coarse grits for repair.

    Forgetting to oil afterwards. Fresh edges rust quickly.


    Conclusion: start simple, go slowly

    Sharpening bonsai tools isn’t as hard as it looks. For most growers, a 1000/6000 combination stone for scissors and one curved stone for concave cutters cover almost everything. Add a coarser stone if your tools are damaged, and diamond files for quick touch-ups.

    Keep the original angle, remove as little metal as possible, never grind the back of scissors, and oil your tools afterwards. For damaged blades, wire cutters or expensive tools, a professional sharpener is a sensible choice.

    Look after your edges, and your tools will make cleaner cuts and healthier trees for years.

    Ready to sharpen? Search 1000/6000 combination whetstones on Amazon, or check Bonsai Tonight’s small sharpening stone.

  • Bonsai Gifts by Budget: 10 Ideas Under $25, $50, $100 and One Big Splurge

    Bonsai Gifts by Budget: 10 Ideas Under $25, $50, $100 and One Big Splurge

    Affiliate disclosure: Some links on this page are affiliate links. If you buy through them, Aribonsai may earn a small commission at no extra cost to you. It doesn’t change what we recommend or how we rank anything. Wazakura has also given us a discount code for readers, which we share below.


    You know your budget. You just don’t know what bonsai people actually want.

    Holiday shopping for someone who grows bonsai usually starts the same way. You know they love their trees. You know roughly what you want to spend. Then you search “bonsai gifts” and get a wall of plastic tool sets, novelty mugs and tiny trees in glued-on rocks.

    Most experienced growers don’t want any of that. What they want is usually smaller and more specific: a good pair of scissors, a handmade pot, a proper Japanese cutter they’ve been putting off buying for themselves.

    The good news is that real bonsai gifts exist at almost every price. A handmade pot can cost less than a takeaway dinner. A genuine Japanese tool can fit under $50. And if you want to make someone’s year, there are splurge gifts that a grower will use for decades.

    In my experience, the best gift isn’t the most expensive one. It’s the thing they’d buy themselves eventually, but keep putting off. This guide is organized by budget, so you can go straight to your price range and pick something useful.

    We already have a broader bonsai gifts guide organized by who you’re buying for. This one adds ten new ideas, sorted by how much you want to spend.


    Who this bonsai gifts by budget guide is NOT for

    It’s not for buying a tree. Trees are personal, and many growers prefer to choose their own. Our main gifts guide covers beginner trees if that’s what you want.

    It’s not for last-minute shoppers who need delivery tomorrow. Some of these gifts ship from Japan or Europe, and good small items sell out. Order early.

    It’s not a list of novelty items. Everything here is something a grower would actually use.

    Still with us? Let’s go.


    How we picked these (3 things that actually matter)

    1. Real usefulness

    Every pick is a tool, pot or supply that a bonsai grower uses. No decorative extras that end up in a drawer.

    2. Low risk of a wrong guess

    Some gifts are safer than others. A second pair of scissors is always handy. A pot is a lovely gift, but size and style matter. We note which picks are safe bets and which need a little detective work.

    3. Good value at each price

    At each budget, we picked items that feel like more than their price: handmade, Japanese-made, or simply very good at their job.

    A few gift-buying habits that matter more than the budget

    None of these cost anything.

    • Check what they already have. A glance at their tool roll or bench tells you a lot.
    • Order early. International shipping and sold-out stock are the two biggest holiday risks.
    • Keep the receipt. Especially for pots and tools that come in sizes.
    • Add a small extra. A bottle of tool oil or a roll of wire makes a tool gift feel complete.
    • Think about their level. Beginners need basics. Experienced growers appreciate upgrades.

    Bonsai gifts by budget comparison table

    BudgetGiftApprox. priceSafe bet?
    Under $25Korean handmade mame pot by Miju~$15Yes, for small trees
    Under $25Wazakura aluminum training wire~$19.99Yes
    Under $50Wazakura Bonsai Folding Saw~$29.99Yes
    Under $50Wazakura Banko small rounded pot~$32.99Mostly
    Under $50Wazakura Yasugi Steel Satsuki Scissors~$45.99Yes
    Under $100Wazakura Concave Branch Cutter~$59.99Yes
    Under $100Kaneshin Concave Cutter No. 3a~$74.95Yes
    Under $100Japanese mame pot by Shozan~€72Mostly
    SplurgeKaneshin 8-Piece Tool Set with Case~$379.95Yes, for serious growers
    SplurgeVintage Bigei pot~$135–390For collectors

    Prices are approximate, from when we checked in October and November, and change often. Many items are single pieces or sell out. Use code ARIBONSAI for 10% off at Wazakura.


    Bonsai gifts under $25

    1. Korean handmade mame pot by Miju (~$15)

    A handmade pot for less than $20 is one of the nicest small gifts you can give a bonsai person.

    Wigert’s Bonsai in Florida sells handmade pots by Korean potter Miju, listed as “Handmade Shohin + Mame pots from South Korea.” One we checked measured 2¼ × 2⅜ × 1¼ inches inside and cost $15. Wigert’s notes that pots are packed carefully and shipped insured.

    Pros

    • Handmade at a very low price
    • One-of-a-kind pieces
    • US-based seller

    Cons

    • Only suits very small trees
    • Individual pots sell out

    Best for: anyone who grows small or mame trees, or likes collecting pots.

    Check Korean pots by Miju at Wigert’s Bonsai


    2. Wazakura aluminum training wire (~$19.99)

    Wire is something every grower uses up. A roll in a useful size is a gift that will definitely get used.

    Wazakura sells brown and black aluminum training wire in its “Made in Japan” collection, in sizes from 1mm to 6mm, at $19.99 for 150g. Brown blends in with bark, which many growers prefer.

    Pros

    • Always useful
    • Brown or black finish
    • Wide range of sizes

    Cons

    • Small roll for the price
    • You need to guess a useful size (2mm to 3mm is a safe middle)

    Best for: stocking stuffers, or adding to a bigger tool gift.

    Check Wazakura training wire


    Bonsai gifts under $50

    3. Wazakura Bonsai Folding Saw (~$29.99)

    A saw is a tool many growers don’t think to buy until they need it, which makes it a great gift.

    Wazakura’s folding saw is made in Miki, Hyogo, a region famous for blade making. It has an SK5 carbon steel blade, measures 250mm open and 145mm folded, and has a 100mm blade. It’s $29.99 on Wazakura’s store, though it was showing as sold out when we checked, so look for restocks.

    Pros

    • Japanese-made at a low price
    • Compact, folds for a tool bag
    • Useful for branches too thick for cutters

    Cons

    • Often sold out
    • Carbon steel needs drying after use

    Best for: growers who already have cutters and scissors.

    Check the Wazakura Bonsai Folding Saw


    4. Wazakura Banko small rounded pot (~$32.99)

    A Japanese-made pot at an accessible price.

    Wazakura’s Banko Series Small Rounded Bonsai Pot is handmade in Yokkaichi, Mie Prefecture. The brush white version measures 110 × 110 × 75 mm (about 4.3 inches), with one large drainage hole, and costs $32.99. Wazakura suggests it for shohin bonsai and seedlings.

    It was sold out when we checked in late October, so check other colors and restocks.

    Pros

    • Made in Japan
    • Attractive brushed glaze
    • Good size for small trees

    Cons

    • Sold out at times
    • Pot size and style are a matter of taste

    Best for: someone with small trees who’d enjoy a Japanese pot.

    Check the Wazakura Banko small rounded pot


    5. Wazakura Yasugi Steel Satsuki Scissors (~$45.99)

    Scissors are the safest tool gift there is. Every grower uses them, and a second good pair is never wasted.

    Wazakura’s Yasugi Steel Satsuki Scissors use YCS3 Yasugi specialty steel, are 180mm long with a 45mm blade, and weigh 103g. Wazakura describes the steel as “extra strong, wear-resistant and long-lasting sharp.” There’s also a plain carbon version at $39.99 if you want to spend a little less. Our bonsai shears guide covers both.

    Pros

    • A safe, useful gift
    • Upgraded Japanese steel under $50
    • Light and comfortable

    Cons

    • Carbon-based steel needs oiling
    • They may already have a favorite pair

    Best for: almost any grower, from beginner to experienced.

    Check the Wazakura Satsuki Bonsai Scissors


    Bonsai gifts under $100

    6. Wazakura Hand Forged Concave Branch Cutter (~$59.99)

    If the person has been using a cheap tool set, a proper concave cutter is one of the most noticeable upgrades you can give.

    Wazakura’s cutter is hand-forged in Sanjo, Niigata, from S55C carbon steel with a black coating. It’s 200mm long with 25mm blades, weighs 190g and cuts branches of about 8–13mm. It’s $59.99, though it was showing as sold out when we checked in November. We picked it as the most accessible Japanese option in our concave cutter guide.

    Pros

    • A real upgrade from cheap tools
    • Japanese-made at a fair price
    • Light and easy to use

    Cons

    • Often sold out
    • Not for very thick branches

    Best for: a grower ready for their first proper Japanese cutter.

    Check the Wazakura Concave Branch Cutter


    7. Kaneshin Concave Cutter No. 3a (~$74.95)

    If you’d rather give one of the best-known Japanese brands, Kaneshin is the classic choice.

    Bonsai Outlet in the US lists the Kaneshin No. 3a concave cutter at $74.95. Kaneshin is widely recommended on bonsai forums for sharpness and durability, and it’s easy to buy from US retailers, which makes returns simpler if needed.

    Pros

    • A respected Japanese brand
    • Easy to buy and return in the US
    • Widely recommended by growers

    Cons

    • More expensive than Wazakura
    • They may already own one

    Best for: experienced growers, or anyone who’d appreciate a well-known name.

    Check Kaneshin tools at Bonsai Outlet


    8. Japanese mame pot by Shozan (~€72)

    For a pot lover, a handmade Japanese mame pot is a thoughtful gift.

    bonsaipots.eu sells a mame pot by Shozan with a deep, glossy green glaze. It measures 8.2 × 6.8 × 3.7 cm outside and costs €72 including VAT. The shop suggests it for small deciduous or flowering bonsai, noting that the green pairs well with red or orange autumn leaves.

    It’s a European shop, so check shipping costs and times if you’re elsewhere.

    Pros

    • Handmade Japanese pot
    • Beautiful glaze
    • Curated, one-of-a-kind piece

    Cons

    • Ships from Europe
    • Only one in stock when we checked

    Best for: someone who grows small trees and loves pots.

    Check the Shozan mame pot at bonsaipots.eu


    The splurge gifts

    9. Kaneshin 8-Piece Tool Set with Case (~$379.95)

    If you want to give a gift that a grower will use for years, a complete Kaneshin set is hard to beat.

    Bonsai Outlet lists Kaneshin’s 8-piece tool set with case at $379.95. A full set covers the main cutting and wiring jobs, and the case keeps everything together and protected.

    Pros

    • Complete set from a respected brand
    • Case included
    • Available from a US retailer

    Cons

    • Expensive
    • An experienced grower may already own some of these tools

    Best for: a serious grower, or someone you know is ready to commit to the hobby.

    Check the Kaneshin 8-Piece Tool Set at Bonsai Outlet


    10. A vintage Bigei pot (~$135–390)

    For a collector, a pot by a famous Japanese maker can be a once-in-a-lifetime gift.

    Bonsai Outlet has listed vintage Bigei pots acquired from a local collector, including 2-inch pots at $155 and $205 and 3-inch pots at $135 to $180. Wigert’s has also listed a one-of-a-kind handmade Bigei pot at $390.

    Pros

    • Famous Japanese maker
    • Vintage, one-of-a-kind
    • A true collector’s gift

    Cons

    • Expensive for the size
    • Single pieces sell quickly
    • Very personal choice

    Best for: collectors, or a grower with a refined small tree.

    Check Japanese pots at Bonsai Outlet


    Which bonsai gift should you buy? (By situation)

    You want a small stocking stuffer: Wazakura training wire, or a Miju mame pot.

    You want a safe tool gift under $50: Wazakura Yasugi Steel Satsuki Scissors.

    They already have the basics: the Wazakura Folding Saw.

    They’re ready for a real upgrade: a Wazakura or Kaneshin concave cutter.

    They love pots: the Wazakura Banko pot, or the Shozan mame pot.

    You want to make their year: the Kaneshin 8-Piece Tool Set.

    They’re a collector: a vintage Bigei pot.

    They’re a complete beginner: see our bonsai tools for beginners guide for what to buy first.

    Simple gift bundles

    • Under $50: training wire plus a Miju pot.
    • Under $75: Satsuki scissors plus training wire.
    • Under $100: concave cutter plus training wire.

    If you’re buying more than one thing from Wazakura, remember the ARIBONSAI code takes 10% off the whole order.

    Matching the gift to the grower

    The tidy one with a perfect tool roll: go for an upgrade rather than a duplicate. A better steel or a tool they don’t have yet, like a saw, usually lands well.

    The one with dozens of small trees: pots and wire. They’ll always need more of both.

    The one who just started this year: keep it simple. A good pair of scissors is more useful than a big set they don’t know how to use yet.

    The one who seems to have everything: a handmade pot. No two are the same, so it’s hard to duplicate.


    Gift timing and delivery tips

    Order early. Some of these gifts ship internationally, and holiday shipping is slower.

    Check stock first. Wazakura and pot sellers often sell out. If an item is sold out, choose another from the same budget.

    Check import tax. Free shipping doesn’t always mean no duties.

    Consider a gift note instead of guessing a size. If you’re unsure about a pot, a note saying “for your next pot” with a gift card from a bonsai shop is a reasonable alternative.

    Add care instructions. Many Japanese tools are carbon steel. A small note or bottle of oil helps. Our tool maintenance guide explains the basics.


    Common bonsai gift mistakes

    Buying a generic “bonsai kit” with plastic tools. Experienced growers rarely use them.

    Guessing pot sizes for big trees. Pots for small trees are a safer guess.

    Buying tools they already own. Check their tool roll first.

    Leaving it too late. Good items sell out before the holidays.

    Assuming expensive is better. A $15 handmade pot can mean more than a $100 gadget.


    Conclusion: pick a budget, then pick something they’ll use

    Good bonsai gifts exist at every price. Under $25, a handmade Miju pot or a roll of wire is a small but genuinely useful gift. Under $50, Wazakura’s scissors or folding saw give real Japanese quality. Under $100, a concave cutter is one of the best upgrades you can give. And if you want to splurge, a Kaneshin set or a vintage Bigei pot is something they’ll treasure.

    Whatever you choose, order early, check stock, and add a small note. A bonsai grower will appreciate the thought, and use the gift for years.

    Ready to shop? Browse Wazakura bonsai tools → and use code ARIBONSAI for 10% off, or check Kaneshin at Bonsai Outlet →.

  • Wazakura Bonsai Tools Review: Are These Affordable Japanese Tools Worth It? (Plus 10% Off)

    Wazakura Bonsai Tools Review: Are These Affordable Japanese Tools Worth It? (Plus 10% Off)

    Affiliate disclosure: Some links on this page are affiliate links. If you buy through them, Aribonsai may earn a small commission at no extra cost to you. It doesn’t change what we recommend or how we rank anything. Wazakura has also given us a discount code for readers, which we share below.


    The gap between cheap tools and “real” Japanese tools

    Most people start bonsai with a cheap tool set. It does the job for a while. Then the scissors start crushing shoots instead of cutting them, the concave cutter leaves a ragged wound, and you start reading forum threads about Japanese tools.

    That’s when the prices hit. A single Kaneshin cutter can cost more than your whole first set. Masakuni costs more again. It’s easy to feel stuck between tools that don’t cut cleanly and tools that feel like a big commitment.

    Wazakura sits right in that gap. It’s a Japanese brand selling tools made by workshops in Sanjo and Miki, two of Japan’s best-known metalworking towns, at prices much closer to mid-range imports than to the big names.

    We’ve included Wazakura in a lot of our buying guides on this site, from concave cutters and shears to saws, tweezers and starter kits. In my experience, it’s the brand we end up recommending most often to people buying their first proper Japanese tool. This review pulls all of that together: what Wazakura does well, where it falls short, which tools are worth buying, and how to save 10% if you decide to order.


    Who this Wazakura review is NOT for

    It’s not for collectors. If you want a lifetime premium tool with decades of professional history behind it, look at Masakuni or Kaneshin’s higher steel grades. Our Kaneshin vs Masakuni comparison covers both.

    It’s not for people who want stainless steel across the board. Most of Wazakura’s core cutters are carbon steel. That means a little more care.

    It’s not for people who need a tool this week. Wazakura’s stock sells out often. If you need something urgently, a local retailer may be a safer bet.

    Still with us? Let’s go.


    How we judged Wazakura (3 things that actually matter)

    1. Is it really made in Japan?

    This is the first question many people ask about a brand they haven’t heard of. Wazakura says its cutters are made at a Sanjo workshop in Niigata Prefecture, run by a third-generation family of blacksmiths and founded in 1912. Its own article describes each pair taking 50 to 60 processes and 5 or 6 people, with Yasugi steel named as the preferred material. Several other Wazakura tools, including its folding saw and chisel kit, come from Miki in Hyogo, another traditional blade-making region.

    One honest note: not every product is described the same way everywhere. When we looked at Wazakura’s 3-piece soil sieve set, one US retailer listed it as manufactured in China for Wazakura, while some marketplace listings said Japan. For the core cutting tools, the listings consistently say Sanjo.

    2. Price for what you get

    Wazakura’s main cutters were mostly priced between about $40 and $60 when we checked, with free shipping to the US, Canada, the UK, the EU and some other regions from its own store. Import tax may still apply depending on where you live.

    On Bonsai Nut, one member puts standard-steel Wazakura tools at about $30 to $45, with stainless versions about $20 to $30 more. Either way, that’s well below Kaneshin’s typical US retail prices. Bonsai Outlet, for example, lists Kaneshin’s No. 3a concave cutter at $74.95.

    3. How the tools actually perform

    Wazakura has less long-term history on forums than Kaneshin or Masakuni. That’s the main trade-off. But early feedback is positive. One new buyer on Bonsai Nut noted that the concave cutters meet very tightly, which is exactly what you want from a cutter. Reviewers of the wire cutter mention it handles up to roughly gauge 4 copper wire comfortably.

    A few habits that matter more than the brand

    None of these cost anything.

    • Dry and oil carbon steel tools after use. Most Wazakura cutters are carbon steel. Our tool maintenance guide covers what you need.
    • Stay inside the cutting range. The concave cutter is rated for about 8–13mm. Forcing thicker branches can damage any cutter.
    • Don’t cut wire with scissors or cutters. Use the wire cutter for wire.
    • Buy the tools you’ll use first. A good concave cutter and a pair of scissors cover most early work.

    Wazakura bonsai tools comparison table

    ToolSteelSize / weightPrice when checkedBest for
    Concave Branch CutterS55C carbon, black coated200mm, 190g$59.99First serious cutter
    Satsuki ScissorsS58C carbon180mm, 84g$39.99Everyday trimming
    Yasugi Steel Satsuki ScissorsYCS3 Yasugi steel180mm, 103g$45.99Better edge retention
    Wire CutterS55C carbon, black coated195mm, 220g$55.99Wiring and removing wire
    Wire & Jin PliersS55C carbon, black coated210mm, 230g$45.99Wire application, jin work
    Root CutterS55C carbon, black coated210mm, 274g$59.99Repotting and thick branches
    3PCS Starter KitCarbon scissors + stainless tweezersScissors, tweezers, broom$69.99Beginners and gifts

    Prices are from Wazakura’s own store when we checked in September to November and may change. Many items sell out, so always check current stock. Use code ARIBONSAI for 10% off.


    The best Wazakura bonsai tools, reviewed

    1. Hand Forged Concave Branch Cutter 8″ (200mm) – the one to buy first

    If you only buy one Wazakura tool, make it this one. A concave cutter is the tool that most clearly separates cheap sets from good ones, because a clean, slightly hollow cut heals far better than a crushed one.

    It’s hand-forged in Sanjo from S55C carbon steel with a black coating. It’s 200mm long with 25mm blades, weighs 190g and has a stated cutting range of about 8–13mm (5/16″ to 1/2″). Wazakura says the blade is thinned to the limit of the steel to cut regrowth cleanly. It’s $59.99 on Wazakura’s store, though it was showing as sold out when we checked in November.

    We picked it as the most accessible entry point in our concave cutter guide.

    Pros

    • Japanese-made at a mid-range price
    • Light at 190g
    • Free shipping to several regions

    Cons

    • 8–13mm range is limiting on thick branches
    • Carbon steel needs oiling
    • Often sold out

    Best for: anyone upgrading from a cheap cutter.

    Check the Wazakura Concave Branch Cutter →


    2. Satsuki Bonsai Scissors (180mm) – the light everyday pair

    Scissors are the tool you’ll pick up most, so comfort matters. Wazakura’s satsuki scissors are S58C black carbon steel, 180mm overall with a 40mm blade, and weigh just 84g. At $39.99, they were the cheapest real Japanese shears in our bonsai shears guide, and the lightest.

    The upgrade: Wazakura also makes a Yasugi Steel version in YCS3 alloy tool steel, 180mm with a 45mm blade and 103g, for $45.99. Wazakura describes the steel as “extra strong, wear-resistant and long-lasting sharp.” Given the small price gap, the Yasugi version is close to a free upgrade if you’re already ordering.

    Pros

    • Very light and comfortable
    • Low price for Japanese scissors
    • Yasugi upgrade for only about $6 more

    Cons

    • Plain carbon version needs regular oiling
    • Fewer long-term reviews than bigger brands

    Best for: everyday trimming, and anyone buying their first Japanese scissors.

    Check the Wazakura Satsuki Bonsai Scissors →


    3. Hand Forged Bonsai Wire Cutter (195mm) – a real wire cutter without the big price

    If you wire trees, a proper wire cutter is worth having. It cuts close to the bark without damaging it, which regular pliers can’t do.

    Wazakura’s wire cutter is S55C carbon steel with a black coating, 195mm long with a 12mm blade, and 220g. At $55.99, it was the cheapest dedicated Japanese wire cutter in our wire cutter guide. The ends are rounded to protect bark, and reviewers say it handles up to roughly gauge 4 copper wire comfortably, though Wazakura doesn’t state an official capacity. It’s also sold in a two-tool set with pliers.

    Pros

    • Low price for a Japanese wire cutter
    • Rounded ends protect bark
    • Available as a set with pliers

    Cons

    • Only one size
    • Carbon steel needs care

    Best for: anyone starting serious wiring work.

    Check the Wazakura Wire Cutter →


    4. Hand Forged Wire & Jin Pliers (210mm) – a sensible first pair

    Jin pliers are used for applying and removing wire and for stripping bark on deadwood. Wazakura’s pair is S55C carbon steel with a black coating, 210mm long and 230g, hand-forged in Sanjo. It’s $45.99.

    Wazakura describes it as being for shaping training wire, styling and safely removing wire. The ends are rounded to protect the tree, and the handles are designed to reduce hand fatigue. At 210mm, it has enough leverage for most wire without being clumsy around smaller trees.

    Pros

    • Low price for Japanese jin pliers
    • Good all-round length
    • Rounded, bark-friendly ends

    Cons

    • Only one size
    • Less long-term feedback than bigger brands

    Best for: your first pair of jin pliers, or a backup pair.

    Check the Wazakura Wire & Jin Pliers →


    5. Hand Forged Bonsai Root Cutter (210mm) – the repotting workhorse

    A root cutter makes repotting much easier, and it doubles as a heavy-duty cutter for thick branches.

    Wazakura’s root cutter is S55C carbon steel with a black coating, 210mm (225mm overall) and 274g, for $59.99. Wazakura describes it as a dual-purpose tool for root pruning, trimming thick branches and splitting thinner trunks, and quotes the maker, Yusuke Ogawa, saying it works “for thick branches, root processing, and jin work.”

    At 274g, it’s lighter than Kaneshin’s 210mm carbon model, which weighs 370g or more. That makes it easier to use for long repotting sessions.

    Pros

    • Low price for a Japanese root cutter
    • Light for its size
    • Useful for roots, thick branches and jin

    Cons

    • Carbon steel needs drying after wet repotting work
    • Only one size

    Best for: growers who repot several trees a year.

    Check the Wazakura Root Cutter →


    6. 3PCS Bonsai Starter Kit – the easiest first purchase

    If you’re new to bonsai, or buying a gift, this is the simplest way into Wazakura.

    For $69.99, you get satsuki bonsai scissors in S58C black carbon steel, stainless steel tweezers with a rake end, and a bonsai broom for cleaning soil surfaces. It’s made in Sanjo. It was the lowest-priced set in our bonsai starter tool sets guide by a wide margin.

    Notice what’s missing: there’s no concave cutter or wire cutter. This kit is for trimming and tidying, not structural pruning. That’s fine for a first year, but you’ll want a concave cutter later.

    Pros

    • Low price for three Japanese tools
    • Covers everyday tasks
    • Good gift

    Cons

    • No branch cutter
    • Mixed steels mean two care routines

    Best for: beginners with their first one or two trees, and gifts.

    Check the Wazakura 3PCS Starter Kit →


    Other Wazakura products worth knowing about

    Wazakura sells more than cutters. A few we’ve covered in other guides:

    • Bonsai Folding Saw: made in Miki with an SK5 carbon steel blade, 250mm open and 145mm folded, for $29.99.
    • 3-piece chisel kit: a V-parting chisel, a skew chisel and a round gouge from a Miki workshop, for carving jin and shari.
    • Tokoname pots: small handmade pots, with recent listings from about $53.99 to $69.99.
    • Training wire: brown or black aluminum from 1mm to 6mm at $19.99 per 150g, and annealed copper at $29.99 per 300g.
    • Curved mini soil scoop: stainless steel, made in Japan, $24.99.

    Most of these were sold out at some point when we checked, which says something about how quickly Wazakura’s stock moves.


    Which Wazakura tool should you buy? (By situation)

    You’re brand new to bonsai: the 3PCS Starter Kit.

    You already have cheap tools and want one real upgrade: the Concave Branch Cutter.

    You trim a lot and want comfort: the Satsuki Scissors, or the Yasugi Steel version.

    You’ve started wiring: the Wire Cutter and Wire & Jin Pliers, ideally as a set.

    You repot several trees each spring: the Root Cutter.

    You’re buying a gift: the Starter Kit, or the scissors.

    You want premium tools for life: Wazakura may not be for you. Look at Kaneshin or Masakuni.


    Wazakura vs Kaneshin: is it worth paying more?

    Kaneshin is the brand Wazakura is most often compared with. The differences are fairly simple.

    Price. Wazakura’s core tools are usually cheaper. Its concave cutter was $59.99, compared with $74.95 for Kaneshin’s No. 3a at Bonsai Outlet.

    Range. Kaneshin offers many more sizes and steel grades, including stainless and traditional white and blue steels. Wazakura mostly offers one size of each tool in carbon steel.

    Track record. Kaneshin has decades of forum history. Wazakura’s is much shorter.

    Availability. Kaneshin is widely stocked by Western retailers. Wazakura sells mainly through its own store, Amazon and some retailers, and stock runs out often.

    If you want one good tool of each type at a fair price, Wazakura makes a lot of sense. If you want a specific size or steel, or a long track record, Kaneshin is the safer choice.


    Tips for ordering from Wazakura

    1. Use code ARIBONSAI at checkout for 10% off.
    2. Check stock before planning a project. Popular items sell out.
    3. Look at bundles. The wire cutter and pliers set, and 2-piece cutter and scissors sets, can be good value.
    4. Check import tax. Free shipping doesn’t always mean no duties.
    5. Order oil at the same time if you don’t already have it. Most Wazakura cutters are carbon steel.

    Common mistakes with affordable Japanese tools

    Treating carbon steel like stainless. Leaving tools wet leads to rust.

    Using a concave cutter on branches that are too thick. Stay within the rated range.

    Buying a full set before you need it. Start with the tools you’ll actually use.

    Comparing only on price. Size and steel matter too.


    Conclusion: the best first step into Japanese tools

    Wazakura isn’t trying to be Masakuni. It’s a sensible step up from cheap tools: Japanese-made cutters from Sanjo and Miki, mostly in carbon steel, at prices that make your first real tools feel like a reasonable purchase rather than a big one.

    The trade-offs are real. There’s less long-term track record than the big names, only one size of most tools, and stock that sells out. But for most hobbyists, a Wazakura concave cutter and a pair of satsuki scissors will cover the majority of everyday work, and cut far more cleanly than a generic set.

    Look after the steel, stay within each tool’s limits, and these tools should serve you well.

    Ready to upgrade? Shop Wazakura bonsai tools → and use code ARIBONSAI for 10% off, or start with the Wazakura Concave Branch Cutter →.

  • Best Bonsai Shade Cloth: 6 Cloths and Setups to Protect Your Trees From Summer Sun

    Best Bonsai Shade Cloth: 6 Cloths and Setups to Protect Your Trees From Summer Sun

    Affiliate disclosure: Some links on this page are affiliate links. If you buy through them, Aribonsai may earn a small commission at no extra cost to you. It doesn’t change what we recommend or how we rank anything.


    Why summer sun can undo a year of work

    Most bonsai love sun. That’s what makes summer tricky.

    A tree that grew happily all spring can look tired by mid-July. Leaf edges turn brown and crispy. Maples scorch. Small pots dry out by early afternoon. In a hot spell, a tree can go from fine to struggling in a day or two, and the damage often isn’t obvious until it’s done.

    Shade cloth is the simplest fix. A sheet of knitted fabric over your benches cuts the strongest light and heat, reduces water loss, and gives sensitive trees a break during the hottest part of the day.

    The problem is choosing it. Shade cloth comes in percentages from 30% to 90%, in black, white, green and reflective aluminum, in knitted and woven types, and in bulk rolls or ready-made panels. And too much shade can be almost as bad as too little.

    In my experience, the most common mistake isn’t using the wrong brand. It’s using too much shade, or putting it up and forgetting to take it down. This guide explains what percentage to choose, compares six shade cloths and setups, and covers how to put them up without having the wind take them away.


    Who this bonsai shade cloth guide is NOT for

    It’s not for indoor bonsai. If your trees live indoors, light is usually the problem, not too much of it. Different products apply.

    It’s not for cool, cloudy climates where your trees never scorch. If your trees are fine in full sun all summer, you may not need shade cloth at all.

    It’s not about winter protection. For cold weather, see our bonsai winter protection guide.

    Still with us? Let’s go.


    How we picked these (3 things that actually matter)

    1. The right shade percentage

    Shade cloth is labeled by how much light it blocks. A 30% cloth blocks about 30% of the light; a 50% cloth about half.

    For bonsai, lighter is usually better than heavier. On Bonsai Nut, one grower warns that “the more shade the longer and leggier your new growth will be,” and says they’ve seen trees decline under 75% shade kept on all the time. On the Bonsai Mirai forum, a Las Vegas grower who uses 50% in extreme heat says, “I would not go above 50% or 60% especially if its not too hot.”

    What growers report using varies with climate:

    • Pacific Northwest: one Bonsai Mirai forum member recalls Ryan recommending 30%, and the Las Vegas grower notes that sun there is less intense.
    • Seattle: one Bonsai Nut grower uses 40% over mostly deciduous trees once temperatures reach the upper 80s°F, with conifers in full or morning sun.
    • San Antonio: another uses 30% for most species and 50% for Japanese maples and a Brazilian raintree, with no leaf burn.
    • Las Vegas: 50% once temperatures pass about 95–100°F.

    For most growers, 30% to 50% is the range to look at.

    2. Color and material

    Black is the standard, durable and economical choice. According to Pro Fabric Supply’s shade cloth selector, white reflects heat and diffuses light, so it runs cooler underneath. Reflective aluminized cloth like Aluminet reflects sunlight and heat.

    Construction matters too. Pro Fabric Supply explains that knitted shade cloth uses a lock-stitch construction, so cut edges don’t unravel, and it’s lighter and more tear-resistant than woven cloth, which frays when cut and needs hemming. For bonsai benches, knitted cloth is usually the easier choice.

    3. How you’ll put it up

    The best cloth is useless if it blows away. Think about the frame, how you’ll attach the cloth, and whether you’ll want to take it down on cloudy days or at the end of summer.

    A few summer habits that matter more than the cloth

    None of these cost anything.

    • Water and pots first. One Bonsai Nut grower recommends managing heat with watering and suitable pots before adding more shade.
    • Shade the sensitive trees, not everything. Deciduous trees and seedlings often need shade in hot climates; conifers and larger pots may stay in full sun.
    • Don’t move shaded trees straight into full sun. Leaves adapted to shade can burn if suddenly exposed.
    • Use top dressing to slow drying. Bonsai Nut members mention moss as a top dressing. Our bonsai moss guide covers options.
    • Take shade cloth down in strong wind. Growers report torn cloths.

    Bonsai shade cloth comparison table

    OptionShade levelBest forApprox. priceNotes
    Black knitted shade cloth (Be Cool Solutions)50% (other levels available)Most benches~$1.50/ft (6 ft wide), $65 min custom cut8-year prorated UV warranty
    Coolaroo Garden Cover30–50%Small setups, easy to findVaries by size and retailerKnitted HDPE
    White shade clothVariousHot climates, cooler shadeVariesReflects heat
    Aluminet reflective cloth50% (other levels available)Very hot climates~$7.25/ft (14 ft wide)Check outdoor suitability
    DIY frame (conduit or steel pipe)Any clothPermanent bench shadeLow to moderateNeeds proper anchoring
    Natural shade and placementVariesSmall collectionsFreeMorning sun, afternoon shade

    Prices are approximate and vary by size, retailer and shipping. Always check current prices.


    The 6 best bonsai shade cloth options, reviewed

    1. Black knitted shade cloth – the dependable standard

    If you want one shade cloth that works for most bonsai benches, a black knitted cloth around 30% to 50% is the usual choice.

    A good example is Be Cool Solutions 50% Black Tape Knit Shade Cloth, sold in bulk at Greenhouse Megastore. It’s knitted high-density polyethylene with a lock-stitch design that the listing says resists rips, tears and fraying. It’s sold by the linear foot in widths from 6 to 32 feet, starting at $1.50 per foot for the 6-foot width, with a $65 minimum for custom-cut pieces. It can be cut with sharp scissors and attached with snap grommets or zip ties, and it carries an 8-year prorated warranty against UV degradation.

    Black is economical and durable, and it’s what most nurseries use.

    Pros

    • Affordable per foot
    • Cut to size without fraying
    • Long UV warranty
    • Many widths

    Cons

    • $65 minimum for custom cuts
    • Absorbs more heat than white or reflective cloth
    • Ships in about 3 weeks

    Best for: most growers with a bench or two.

    Check black knitted shade cloth at Greenhouse Megastore


    2. Coolaroo Garden Cover – the easy-to-find option

    If you just want something you can pick up at a hardware store or order online, Coolaroo is one of the most widely available brands.

    Coolaroo says most of its shade fabrics are knitted HDPE, and its Garden Cover fabrics come in 30% to 50%. It describes the 30% version as suiting seedlings and herbs that need gentle light, and the 50% version as suiting heat-sensitive plants and helping reduce water loss in hot conditions. Coolaroo also says its color pigments are infused into the yarn rather than applied as a coating, which it claims keeps colors fade-resistant.

    It’s sold through major retailers in pre-cut rolls, which is handy for a small setup.

    Pros

    • Easy to find
    • Plant-specific 30% and 50% options
    • Pre-cut rolls

    Cons

    • Less flexible sizing than bulk cloth
    • Prices vary by retailer

    Best for: beginners and small collections.

    Search Coolaroo shade cloth on Amazon


    3. White shade cloth – cooler shade for hot climates

    White shade cloth is less common, but worth considering if heat is your main problem.

    According to Pro Fabric Supply, white reflects heat and diffuses light, so it runs cooler underneath than darker cloth, which suits situations where you want even light without heat buildup. On Bonsai Nut, one commenter answering a question about shade cloth simply said, “I would just go with white.” Another Bonsai Nut member mentions using layers of white cheesecloth to moderate pot temperature.

    Pros

    • Runs cooler underneath
    • Diffuses light evenly

    Cons

    • Shows dirt more
    • Less widely sold than black

    Best for: hot climates where heat, not just light, is the problem.

    Search white shade cloth on Amazon


    4. Aluminet reflective shade cloth – for very hot climates

    Aluminet is a reflective shade cloth with aluminized fibers. Instead of absorbing heat like black cloth, it reflects sunlight and heat.

    Greenhouse Megastore sells Be Cool Solutions 50% Aluminet Tape Knit Shade Cloth made from metalized HDPE, at $7.25 per foot for the 14-foot width. The listing says the aluminized fibers reflect sunlight and heat in summer and help retain heat in winter, and it carries a 5-year prorated warranty against UV degradation.

    One important note: this specific bulk listing says it’s meant for indoor use, as a ceiling under greenhouse roofs or a movable thermal screen. If you want reflective cloth outdoors over open benches, check that the product you buy is rated for outdoor use.

    Pros

    • Reflects heat as well as light
    • Knitted, so cut edges don’t unravel

    Cons

    • Much more expensive than black cloth
    • This bulk version is listed for indoor use

    Best for: very hot climates and growers with greenhouses or covered structures.

    Check Aluminet shade cloth at Greenhouse Megastore


    5. DIY shade frame – the permanent bench solution

    Shade cloth needs something to hang on. For a permanent setup, many growers build a simple frame over their benches.

    On the Bonsai Mirai forum, growers describe several approaches:

    • Wooden posts. One suggests four 10- or 12-foot 4×4 posts in the ground with 30% cloth on top.
    • Steel pipe. One grower used black structural steel pipe after a PVC frame failed, saying the wind “picked the whole dang thing up” even with rebar in the posts. He slid the pipe over rebar driven into the ground and held the cloth with plastic greenhouse shade-cloth clips, so he can slide it back on cloudy days.
    • Electrical conduit. Another suggests conduit and fittings, which are stiffer and heavier than PVC, anchored with stakes set at opposing angles to resist uplift.
    • Fence-mounted. One grower used a fence for support, with wire cable to take the load and conduit for rigidity.

    On Bonsai Nut, a similar thread suggests burying short sleeves in the ground so poles can slide in and out, making the frame removable.

    Pros

    • Permanent, solid solution
    • Can be built to fit your benches exactly
    • Removable designs possible

    Cons

    • Takes time to build
    • Needs proper anchoring against wind
    • PVC may not be strong enough

    Best for: growers with a permanent bench area and windy summers.

    Search shade cloth clips on Amazon


    6. Natural shade and smart placement – the free option

    Sometimes the best shade isn’t cloth at all.

    Bonsai Nut members mention partial shade from lattice overhead, or a spot that’s shaded for part of the day. One Seattle grower keeps conifers in full or morning sun while deciduous trees get shade. Morning sun with afternoon shade is a common approach for sensitive trees.

    There’s one caution. A Bonsai Nut poster notes that a spot next to a fence can trap heat if airflow is poor, so shade isn’t always cooler if the air can’t move.

    Pros

    • Free
    • No structure needed
    • Easy to adjust by moving trees

    Cons

    • Depends on your yard
    • Harder with many trees
    • Fences can trap heat

    Best for: small collections and growers with a naturally shaded spot.


    Which bonsai shade cloth should you buy? (By situation)

    You have one or two benches and want something reliable: black knitted shade cloth at 30% to 50%.

    You want something quick and easy to find: Coolaroo Garden Cover.

    You live somewhere very hot: white shade cloth, or outdoor-rated reflective cloth.

    You have a greenhouse or covered structure: Aluminet.

    You want a permanent, solid setup: a DIY frame with steel pipe or conduit.

    You have a small collection: try natural shade and smart placement first.

    You grow maples or other delicate deciduous trees: these usually benefit most from shade in hot weather.


    How to put up shade cloth over bonsai

    1. Choose the percentage. Start lighter (30% to 40%) unless you’re in a very hot climate.
    2. Measure your benches, adding a little extra so the cloth covers trees as the sun moves.
    3. Build or choose a frame. Steel pipe or conduit is sturdier than PVC.
    4. Anchor it well. Use rebar, stakes at opposing angles or concrete footings.
    5. Attach the cloth with grommets, clips or zip ties. Clips make it easy to slide the cloth back.
    6. Support large pieces. Greenhouse Megastore notes that pieces over 100 square feet may need a center cable.
    7. Watch your trees for leggy growth or leaf burn, and adjust.

    When to put shade cloth up and take it down

    Growers time it differently depending on climate. On the Bonsai Mirai forum, the Las Vegas grower puts up 50% cloth as soon as temperatures pass about 95–100°F and uses it all summer. On Bonsai Nut, some growers keep shade on from late spring to late fall, while one in a very hot climate puts it up once days exceed 40°C (104°F) and keeps it until near leaf drop, because shaded leaves burn in direct sun.

    A good rule: put shade up before the first real heat wave, not after you see scorched leaves. And when you take it down, do it gradually if you can, because leaves adapted to shade can burn in sudden full sun.


    Shade is only part of summer care

    Shade cloth helps, but it doesn’t replace good watering. On the Bonsai Mirai forum, one grower notes that in summer heat, roots can “steam cook” quickly. Others mention watering several times a day or using automated systems.

    • Water deeply and often. Our bonsai watering can guide covers good options.
    • Automate if you travel. Our automatic watering guide covers timers and drip kits.
    • Watch small pots. They dry out fastest.
    • Check each tree. One grower found misting helped some trees but not others.

    Common bonsai shade cloth mistakes

    Using too much shade. Heavy shade leads to long, leggy growth.

    Putting it up too late. Leaf scorch is hard to undo.

    Building a flimsy frame. Wind can lift PVC structures.

    Leaving it up in strong wind. Cloths can tear.

    Moving trees suddenly from shade to full sun. Leaves can burn.

    Shading everything equally. Conifers often prefer more sun than maples.


    Conclusion: a little shade goes a long way

    The right bonsai shade cloth can be the difference between trees that sail through summer and trees that look scorched by August.

    For most growers, a black knitted cloth at 30% to 50% is the simplest, most dependable choice. Coolaroo is easy to find for small setups, white cloth runs cooler in hot climates, and reflective cloth like Aluminet suits greenhouses and very hot areas. Whatever you choose, give it a sturdy frame, and remember that less shade is often better than more.

    Watch your trees, water well, and adjust as summer goes on.

    Ready to shade your benches? Check black knitted shade cloth at Greenhouse Megastore, or search Coolaroo shade cloth on Amazon.

  • Japanese Bonsai Tool Brands Compared: Masakuni, Kaneshin, Kikuwa, Wazakura and More

    Japanese Bonsai Tool Brands Compared: Masakuni, Kaneshin, Kikuwa, Wazakura and More

    Affiliate disclosure: Some links on this page are affiliate links. If you buy through them, Aribonsai may earn a small commission at no extra cost to you. It doesn’t change what we recommend or how we rank anything.


    Why choosing a bonsai tool brand is so confusing

    Ask on any bonsai forum which tool brand to buy, and you’ll get a dozen answers. Someone swears by Masakuni. Someone else says Kaneshin is just as good for half the money. A third person says their $20 cutters have lasted three years. Then someone posts a rusty tool and reminds everyone that care matters more than the name.

    They’re all partly right. That’s what makes it confusing.

    Japanese bonsai tool brands range from affordable everyday tools to collector-level pieces that cost hundreds of dollars for a single cutter. Some brands are easy to buy in the US or Europe; others are mostly sold through Japanese export shops. And some tools sold as “Japanese style” aren’t made in Japan at all.

    In my experience, the most useful way to think about brands is by tier, not by ranking. A beginner, a serious hobbyist and a professional all have different “best” brands. This guide compares six brands you’ll see most often, explains what each is known for, and helps you decide which tier fits you.


    Who this Japanese bonsai tool brands guide is NOT for

    It’s not a head-to-head on two brands. If you’ve already narrowed it down to the big two, our Kaneshin vs Masakuni comparison goes tool by tool.

    It’s not a review of individual tools. We’ll mention examples, but we have separate guides for each tool type.

    It’s not for people who only want the cheapest option. We’ll mention budget tools, but the focus is on proper bonsai tool brands.

    Still with us? Let’s go.


    How we compared these brands (3 things that actually matter)

    1. Where the tools are made

    Many people buy Japanese tools specifically for Japanese craftsmanship. But origin is not always obvious from a brand name. One experienced member of an Australian bonsai forum notes that Japanese tools were once clearly the best, that Chinese makers such as Ryuga now produce excellent tools, and that some Japanese companies source parts of their range from China.

    That doesn’t make one origin “bad.” It just means it’s worth checking where a specific tool is made if that matters to you.

    2. Price for the same job

    The gap between brands is often bigger than the gap in performance. A brand review from Wabi Bonsai put Masakuni’s performance gain over Kaneshin at “perhaps 10–15% while the price difference often exceeds 100%.” For most hobbyists, that’s the key question: is the extra money buying something you’ll actually notice?

    The same forum member makes a practical point: for most hobbyists, price is likely the deciding factor, because the difference between beginner, intermediate and professional grades can be hard to spot.

    3. Steel options and availability

    Some brands make the same tool in several steels: plain carbon, coated carbon and stainless. Others focus on one. Our stainless vs carbon steel guide explains the trade-offs.

    Availability matters too. A brand that’s easy to buy locally means simpler returns and faster delivery.

    A few habits that matter more than the brand

    None of these cost anything.

    • Clean and oil your tools. Rust ruins good tools fast. Our tool maintenance guide covers what you need.
    • Use the right tool for the job. Don’t cut wire with shears, or roots with concave cutters.
    • Don’t leave tools outside. One forum member’s cutters rusted badly after being left outdoors.
    • Buy the tools you’ll actually use first. A great brand doesn’t help if half the set sits in a drawer.

    Japanese bonsai tool brands comparison table

    BrandMade inTierApprox. price examplesEasy to buy in US/Europe?
    MasakuniJapanPremium / collectorHigher lines ~¥38,000–148,000Mostly Japanese export shops, some Western retailers
    KaneshinJapanMid to premiumConcave cutter ~$75, 8-piece set ~$380 (US retail)Yes, widely stocked
    KikuwaJapanBudget to midMany tools ~¥2,000–18,000Japanese export shops, some retailers
    WazakuraJapan (Sanjo)Budget to mid~$30–45 standard steel (forum report)Yes, including Amazon
    YoshiakiJapanBudget to midBud shear ~$30, 6-piece stainless kit ~$395US retailers
    RyugaChinaValue~$30–98Yes, e.g. Eastern Leaf

    Prices are approximate, vary by retailer and exchange rate, and change often. Always check current prices.


    The 6 Japanese bonsai tool brands, reviewed

    1. Masakuni – the premium name with a long history

    Masakuni is the brand many people think of first when they hear “high-end bonsai tools.”

    According to UK retailer Kaizen Bonsai’s history of the brand, Masakuni traces its bonsai tools back to Shichinosuke Kawasumi, the first Masakuni, who made flower-arranging scissors and medical cutting tools. Kaizen Bonsai describes him as creating the first shears in Japan made specifically for bonsai, and later developing tools with bonsai master Kyuzo Murata.

    Masakuni sells a standard range, a silver 8000 series with an anti-rust coating over high-carbon steel, and much more expensive specially finished and made-to-order lines. Those higher lines are listed from around ¥38,000 up to ¥148,000. On Bonsai Nut, one member says Masakuni needle tweezers were “Expensive for tweezers but worth it,” while another finds the price hard to justify.

    Pros

    • Long professional reputation
    • Often lighter tools with a consistent finish
    • Coated 8000 series for rust resistance

    Cons

    • Expensive, especially sets and higher lines
    • Less widely stocked in Western shops

    Best for: professionals, collectors, and serious hobbyists who want a lifetime tool and are happy to pay for it.

    See the Masakuni lineup at Bonsai Network Japan


    2. Kaneshin – the best all-round value for most growers

    If you want proper Japanese tools without paying Masakuni prices, Kaneshin is the brand most people end up recommending.

    Kaneshin is listed among Gifu Prefecture’s cutlery makers, and several retailers describe it as handcrafting tools in Japan since 1919. It sells the same basic shapes in several steel grades: plain carbon, traditional white and blue steel, plated finishes and stainless.

    It’s also easy to buy outside Japan. Bonsai Outlet in the US lists Kaneshin concave cutters (No. 3a) at $74.95, knob cutters (No. 11) at $64.95, wire cutters (No. 511) at $67.95, jin pliers (No. 48A) at $54.95 and an 8-piece tool set with case at $379.95. On forums, members praise its sharpness and customer service. One long-time owner feels quality has slipped “a little bit” over the years, which is worth knowing, but the brand is still widely recommended.

    Pros

    • Strong value for Japanese-made tools
    • Wide range of sizes and steels
    • Widely stocked in the US and Europe

    Cons

    • Not the lightest tools
    • Some long-time users feel quality varies

    Best for: most hobbyists, from serious beginners to experienced growers.

    Check Kaneshin tools at Bonsai Outlet


    3. Kikuwa – affordable Japanese tools with a huge range

    Kikuwa is less famous than Masakuni or Kaneshin in the West, but it’s consistently recommended on forums. One Bonsai Nut member says they’ve “been happy with them” and have used them for years without problems.

    Its range is large. Bonsai Network Japan listed 45 Kikuwa items when we checked, from bud cutting scissors at ¥1,900 and stainless tweezers around ¥2,100 to ¥3,500, through stainless bonsai scissors at ¥7,000, up to stainless pruning and bud shears at ¥18,000 and a blue paper steel grafting knife at ¥22,000. There’s also a 10-piece beginner tool set at ¥14,500.

    That range makes Kikuwa especially useful for scissors and smaller tools, where you can get Japanese quality without high prices.

    Pros

    • Very wide range, especially scissors and tweezers
    • Low prices for Japanese tools
    • Many stainless options

    Cons

    • Less widely stocked in Western shops
    • Less brand information available in English

    Best for: growers who want affordable Japanese scissors, tweezers and small tools.

    Browse Kikuwa tools at Bonsai Network Japan


    4. Wazakura – Japanese-made tools at an accessible price

    Wazakura is a newer name for many growers, but it has become popular, partly because it’s easy to buy on Amazon.

    Wazakura says its cutters are made at a Sanjo workshop in Niigata Prefecture, run by a third-generation family of blacksmiths and founded in 1912. Its article describes each pair taking 50 to 60 processes and 5 or 6 people, with Yasugi steel named as the preferred material.

    On Bonsai Nut, one member puts standard-steel Wazakura tools at about $30 to $45, with stainless versions about $20 to $30 more. A new buyer noted that the concave cutters meet very tightly.

    Pros

    • Made in Japan (Sanjo)
    • Accessible prices
    • Easy to buy, including on Amazon

    Cons

    • Shorter track record in the West than older brands
    • Fewer specialist tools than the biggest brands

    Best for: beginners and hobbyists who want Japanese-made tools without a big outlay.

    Shop Wazakura bonsai tools

    *Tip: Use code **ARIBONSAI** at checkout for 10% off at Wazakura.*


    5. Yoshiaki – hand-forged Japanese tools from US retailers

    Yoshiaki tools show up at several US bonsai retailers, often as a step between budget tools and Kaneshin.

    Bonsai Outlet lists a Yoshiaki Japanese Azalea & Bud Bonsai Shear at $29.90, described as the smallest in the A-Series and tagged “Hand Forged.” Bonsai Learning Center sells a 6-piece stainless steel Yoshiaki kit, listed as made in Japan, for $395. It includes a shear, knob cutter, concave cutter, wire cutter, root rake, tweezers and a leather tool roll.

    There’s not much brand history available in English, so it’s harder to know as much about Yoshiaki as the bigger names. But it’s a practical option if you want Japanese tools from a US shop.

    Pros

    • Japanese-made
    • Available from US retailers
    • Stainless kit available

    Cons

    • Little brand information in English
    • Smaller range than Kaneshin or Kikuwa

    Best for: US growers who want Japanese tools from a local retailer.

    Check the Yoshiaki stainless kit at Bonsai Learning Center


    6. Ryuga – the value pick (made in China)

    Ryuga isn’t Japanese-made, but it belongs in this comparison because so many growers consider it alongside Japanese brands.

    Eastern Leaf lists Ryuga tools as made in China. Examples include a carbon steel scissor-style wire cutter at $29.95, a carbon steel heavy-duty wire cutter at $59.95, stainless root and concave cutters at $79.95, and a stainless 8-inch concave cutter at $97.95.

    Opinions are mixed but mostly positive. On an Australian forum, one member says “for the price I think Ryuga is awesome,” and another calls Ryuga a strong Chinese-made option. On Bonsai Nut, one owner says their Ryuga pair “just hang about in the tool box,” suggesting they preferred other tools.

    Pros

    • Good value
    • Stainless options at lower prices
    • Widely available in the US

    Cons

    • Not made in Japan
    • Mixed opinions on long-term preference

    Best for: growers who want decent stainless tools on a budget and don’t need Japanese origin.

    Check Ryuga tools at Eastern Leaf


    Other brands you’ll hear about

    Joshua Roth. Owners on Bonsai Nut are generally happy with Joshua Roth tools, with one saying “I love my Joshua Roth tools.” It’s often recommended alongside Japanese brands.

    Okatsune. Better known for garden pruning shears, Okatsune also makes bonsai scissors. According to Dai Tool’s guide to Japanese gardening tool brands, its blades are forged from Izumo Yasugi steel and reach “very high hardness (60-61 Rockwell).”

    Budget Chinese tools. On forums, opinions vary. One Bonsai Nut member’s $20 off-brand concave cutters have lasted three years, while another found gaps between the blades on a budget set and summed it up as “you get what you pay for.”


    Which bonsai tool brand should you buy? (By situation)

    You’re a beginner on a budget: Wazakura or Kikuwa. Our bonsai tools for beginners guide covers which tools to buy first.

    You want the best value Japanese tools: Kaneshin.

    You want a lifetime premium tool: Masakuni.

    You want affordable Japanese scissors and tweezers: Kikuwa.

    You’re in the US and want to buy locally: Kaneshin, Yoshiaki or Ryuga.

    You want stainless steel cheaply: Ryuga, or Kikuwa for scissors.

    You’re buying a full set: compare sets in our bonsai starter tool sets guide.

    Mixing brands is normal

    You don’t need to buy all your tools from one brand. Many growers use a premium concave cutter, mid-range shears and inexpensive tweezers. Spend more on the tools you use most and that are hardest to replace.


    How to tell if a bonsai tool is genuinely Japanese-made

    Brand names can sound Japanese without the tools being made in Japan. A few simple checks help:

    1. Read the product listing for “Made in Japan.” Good retailers state the origin clearly.
    2. Check the retailer. Specialist bonsai shops and Japanese export stores usually list makers and origin.
    3. Be wary of very low prices. A full “Japanese” set at a fraction of Kaneshin’s price is worth questioning.
    4. Look for maker marks. Many Japanese tools are stamped with the brand.
    5. Remember that origin isn’t everything. As forum members point out, some Chinese-made tools are excellent, and some Japanese companies source part of their range from China.

    Buying from Japan vs buying locally

    Buying directly from Japanese export shops often means lower list prices and access to brands like Kikuwa and Masakuni’s full range. But you add international shipping, possible import tax, a longer wait and harder returns.

    Buying locally usually costs more upfront but makes returns and exchanges simpler. For a $30 tool, buying from Japan may not be worth the hassle. For a premium tool, the savings and the selection can be significant.


    Common mistakes when choosing a brand

    Buying a premium brand before you know what you’ll use. Start with a few essentials.

    Assuming expensive means better for you. The extra cost may buy refinements you won’t notice.

    Buying a cheap set of unknown origin. Quality can vary widely.

    Ignoring maintenance. Even the best brand will rust if you don’t clean and oil your tools.

    Choosing by brand alone. The right size and type of tool matters more than the name.


    Conclusion: the right brand depends on your stage

    There’s no single “best” Japanese bonsai tool brand. There’s the best brand for your stage, budget and priorities.

    For most growers, Kaneshin offers the best balance of quality, price and availability. Masakuni is the premium choice for those who want a lifetime tool. Kikuwa and Wazakura are excellent affordable Japanese options, Yoshiaki is a practical choice from US retailers, and Ryuga is a good value pick if Japanese origin isn’t essential.

    Whatever you choose, take care of your tools, and they’ll take care of your trees for years.

    Ready to choose? Check Kaneshin tools at Bonsai Outlet, or shop Wazakura bonsai tools

    *Tip: Use code **ARIBONSAI** at checkout for 10% off at Wazakura.*

  • Best Mame and Shohin Bonsai Pots: 6 Places to Find Small Pots, From $15 Finds to Japanese Collector Pieces

    Best Mame and Shohin Bonsai Pots: 6 Places to Find Small Pots, From $15 Finds to Japanese Collector Pieces

    Affiliate disclosure: Some links on this page are affiliate links. If you buy through them, Aribonsai may earn a small commission at no extra cost to you. It doesn’t change what we recommend or how we rank anything.


    Why small bonsai pots are harder to buy than they look

    Small bonsai have a charm that’s hard to explain until you see a row of them on a bench. A tree you can hold in one hand. A pot no bigger than a teacup. A whole landscape in a few inches.

    Then you go looking for the pot.

    Search for “mame bonsai pots” or “shohin bonsai pots” and you’ll find two extremes. On one side, cheap, mass-produced pots that look fine in photos and less fine in person. On the other, handmade Japanese pots by named potters that cost more than the tree, sometimes many times more. The middle ground exists, but it’s spread across dozens of shops in different countries, and good small pots tend to sell out quickly.

    There’s also a practical problem. Small pots behave differently. They dry out faster, heat up faster in the sun, and leave very little room for mistakes. A pot that looks perfect but has a tiny drainage hole, or no room for a tie-down wire, can make a small tree much harder to keep healthy.

    In my experience, the best approach to small pots is to buy in layers: a few inexpensive pots for trees still in development, and one or two good pots for the trees you’re proudest of. This guide is built around that idea. It covers six places to find mame and shohin bonsai pots, from $15 handmade Korean pots to vintage Japanese pieces by famous makers.


    Who this mame and shohin bonsai pots guide is NOT for

    It’s not for full-size bonsai. If your tree is larger than about 10 inches tall, our Japanese bonsai pots guide covers Tokoname makers in standard sizes.

    It’s not for trees that still need to grow a lot. Small pots slow growth. If you’re still thickening a trunk, a bigger container will get you there faster. A small pot is for a tree that’s already close to its final size.

    It’s not a deep dive into individual potters. We’ll mention well-known names, but the focus is on where to buy and how to choose.

    Still with us? Let’s go.


    First, what counts as mame and shohin?

    The terms get used loosely, so it helps to be clear.

    According to Bonsai Empire, shohin (小品, “a small thing”) generally means a tree under about 10 inches (25 cm) tall, and mame (豆, “bean”) means under about 4 inches (10 cm). Bonsai Empire also notes that no exact rules were ever formulated, and that experts often suggest a shohin should simply be small enough to hold in one hand.

    Shohin Bonsai Europe describes mame as the smallest subcategory of shohin, up to about 10 cm, with shohin trees generally reaching about 20 cm measured from the pot rim to the top of the tree.

    Pots follow the same rough logic. Shops label things differently, though. One European retailer files pots of 5 to 15 cm under “shohin,” while another labels an 8 cm pot as “mame.” Always check the actual dimensions rather than relying on the label.


    How we picked these (3 things that actually matter)

    1. Function at a small scale

    A small pot still has to do the job of a pot. Look for:

    • A drainage hole that’s large enough. In a tiny pot, a small hole can clog easily.
    • Room for tie-down wire. Some small pots have separate wire holes; others have one large hole you thread wire through. Either works, as long as the tree can be secured.
    • Enough depth for the tree. Very shallow mame pots look elegant, but they hold very little soil and dry out fastest.

    2. Quality you can see up close

    Small pots are viewed from close range, often at eye level on a display stand. Flaws that disappear on a big pot are obvious on a small one: uneven glaze, rough feet, a lopsided rim. Handmade pots by named potters usually justify their price in the details. Cheaper pots can still be good, but it’s worth looking at clear photos of the actual pot.

    3. Price and availability

    Good small pots often exist as single, one-off pieces. Many listings show only one in stock, and popular pots sell out. That makes it worth knowing several shops, and being willing to buy when you see a pot you like.

    A few small-pot habits that matter more than the pot

    None of these cost anything.

    • Water more often. Bonsai Empire notes that as pots get smaller, more regular watering and fertilizing is needed. Shohin Bonsai Europe says mame trees demand extra caretaking with watering and detailed pruning.
    • Consider a slightly finer soil. On an Australian bonsai forum, an experienced grower suggests protecting trees that dry out first with shade and/or a finer mix. Our soil sieve guide covers how to sort soil by size.
    • Protect small pots from midsummer heat. Bonsai Nut members mention shade cloth, partial shade and top dressings like moss as ways to slow drying.
    • Keep the tree tied in. Small root balls move easily, and movement damages fine roots.
    • Match the pot to the tree, not just the shelf. A pot should suit the tree’s trunk and character.

    Mame and shohin bonsai pots comparison table

    SourceOrigin of potsBest forApprox. priceNotes
    Herons Bonsai (UK)Not statedBudget mame and shohin pots~£5–25Plastic and ceramic options
    Wigert’s Bonsai (US)Korea, China, JapanAffordable handmade pots~$15–28 for many small potsKorean Miju pots, Chinese etched pots
    WazakuraJapan (Banko, Tokoname)Japanese pots at a mid-range price~$33–64Free shipping to US, Canada, UK
    Bonsai Plaza (Europe)Mostly JapanHuge selection of named Japanese makers~€28–195+Thousands of small pots
    bonsaipots.eu (Europe)Japan, ChinaCurated Japanese mame pots~€72 for a Shozan mame potSmall, curated shop
    Vintage Bigei (Wigert’s, Bonsai Outlet)JapanCollector pieces~$135–390One-of-a-kind

    Prices are approximate, vary by size, maker and exchange rate, and many listings are single pieces. Always check current prices and stock.


    The 6 best places to buy mame and shohin bonsai pots, reviewed

    1. Herons Bonsai – the budget starting point

    If you want to start with small pots without spending much, Herons Bonsai, a UK nursery, has a dedicated mame and shohin pot section.

    When we checked, the section listed 33 pots. Ceramic pots ranged from about £10 to £19, including a white crackle glaze square at 7 cm, a blue glazed square at 9 cm, a glazed hexagonal pot at 8.5 cm and an unglazed cascade pot. Several larger rectangular and oval pots around 15.5 to 16 cm come with a drip tray. There were also plastic mame and shohin pots from about £5 to £25, plus tiny mame pots from 2.5 to 5 cm at about £5 each.

    The makers and country of origin aren’t stated, so think of these as practical, affordable pots rather than collector pieces. Herons advertises next-day delivery within the UK.

    Pros

    • Very affordable
    • Wide range of tiny sizes
    • Plastic options for development

    Cons

    • Maker and origin not stated
    • Best suited to UK buyers

    Best for: beginners and UK growers stocking up on inexpensive small pots.

    Check mame and shohin pots at Herons Bonsai


    2. Wigert’s Bonsai – affordable handmade pots in the US

    For US buyers, Wigert’s Bonsai in Florida carries a range of small pots, including some genuinely handmade options at modest prices.

    Two stand out. First, handmade Korean pots by Miju, listed as “Handmade Shohin + Mame pots from South Korea.” One we checked measured 2¼ × 2⅜ × 1¼ inches (interior) and cost $15. Second, a set of unglazed etched shohin pots by a Chinese potter, in six shapes from about 3¼ to 5⅛ inches, priced at $25 to $28.

    Wigert’s also sells Japanese pots by makers such as Bigei, Koho and Heian Kosen, so it’s one place where you can move from budget to collector level without switching shops. The listings note that pots are packed carefully, shipped insured, and that damage must be reported within 4 days with photos.

    Pros

    • Handmade pots from about $15
    • Shohin-specific sizes with interior measurements listed
    • US-based

    Cons

    • Many pots are one-off pieces
    • Selection changes often

    Best for: US growers who want handmade small pots without paying Japanese collector prices.

    Check Korean pots by Miju at Wigert’s Bonsai


    3. Wazakura – Japanese-made small pots at a mid-range price

    Wazakura sells Japanese-made bonsai pots in Banko, Tokoname and Shigaraki series, and several of them sit in the shohin size range.

    The Banko Series Small Rounded Bonsai Pot in brush white measures 110 × 110 × 75 mm (about 4.3 inches), weighs 255 g and costs $32.99. It’s handmade in Yokkaichi, Mie Prefecture, with white glaze brush strokes and one large hole for drainage. Wazakura suggests it for shohin bonsai and seedlings, with conifers, pines, junipers and flowering or deciduous trees as good matches.

    In the Tokoname Series, small pots include a 4.1-inch striped square pot at $53.99 and 5.3-inch rectangular glazed pots at $53.99 to $63.99. Wazakura offers free shipping to the US, Canada and the UK.

    One catch: several of these small pots were sold out when we checked, so you may need to watch for restocks.

    Pros

    • Made in Japan
    • Mid-range prices
    • Free shipping to the US, Canada and UK

    Cons

    • Small pots often sold out
    • Limited selection of very tiny mame sizes

    Best for: growers who want a Japanese-made pot without collector prices.

    Check the Banko small rounded pot at Wazakura

    *Tip: Use code **ARIBONSAI** at checkout for 10% off at Wazakura.*


    4. Bonsai Plaza – the biggest selection of Japanese makers

    If you want to browse small pots by named Japanese makers, Bonsai Plaza in Europe is hard to beat for sheer selection.

    Its 5 to 15 cm shohin category listed close to 3,000 pots when we checked, with around 1,256 at 5 to 10 cm and 1,726 at 10 to 15 cm. Makers in the filter include Shibakatsu, Yamaaki, Yamafusa, Eime Yozan, Hattori Tomoyuki, Koishiwara, Bunzan, Kakuzan, Tosui and others, plus Chinese and Korean potters.

    Examples from the first page give a sense of the range:

    • Koishiwara round green, 127 mm: about €28
    • Eime Yozan round dark blue, 130 mm: about €60
    • Shibakatsu rectangular green, 130 mm: about €85
    • Yamafusa oval blue, 137 mm: about €100
    • Yamaaki rectangular unglazed, 132 mm: about €160
    • Yamaaki Koshosen rectangular unglazed, 140 mm: about €195

    Each product shows two prices; the lower one appears to exclude 21% VAT, so check what applies to you at checkout. Shipping costs and times are on a separate page.

    Pros

    • Enormous selection
    • Many well-known Japanese makers
    • Easy to filter by size and maker

    Cons

    • Prices in euros, with VAT to check
    • The selection can be overwhelming

    Best for: growers who know which makers they like and want to compare many pots.

    Browse shohin pots at Bonsai Plaza


    5. bonsaipots.eu – a small, curated shop for Japanese mame pots

    Sometimes a smaller shop is easier to browse than a huge catalog. bonsaipots.eu is a small online store with Japanese, Chinese and antique pots.

    One example is a mame pot by Shozan with a deep, glossy green glaze. It measures 8.2 × 6.8 × 3.7 cm outside and 6.7 × 5.3 × 2.7 cm inside, and costs €72 including VAT. The shop suggests it for small deciduous or flowering bonsai, noting that the green pairs well with orange or red autumn leaves and pale blossoms.

    Listing interior measurements is helpful, because with a mame pot the inside is what matters for roots. When we checked, the listing showed only one in stock, which is typical for small handmade pots.

    Pros

    • Curated Japanese pots
    • Interior measurements listed
    • Helpful notes on tree pairings

    Cons

    • Small catalog
    • Drainage and shipping details not on the product page

    Best for: growers who want a single, carefully chosen Japanese mame pot.

    Check the Shozan mame pot at bonsaipots.eu


    6. Vintage Bigei pots – the collector’s choice

    At the top end, small pots by famous Japanese makers are collectibles in their own right. Bigei is one of the best-known names.

    Bonsai Outlet listed several vintage Bigei pots, acquired from a local collector and already in the US. They included 2-inch pots at $155 and $205 (one a cascade pot), and 3-inch pots at $135 to $180, some attributed to Mr. Hirata Atsumi, with unglazed reddish-brown clay, basketweave relief or hand-carved wicker texture. Wigert’s also listed a one-of-a-kind handmade Bigei pot measuring 3⅛ × 3⅛ × 2¼ inches at $390.

    These aren’t pots you buy for a tree in development. They’re for a refined tree that deserves a special pot, or for collectors who enjoy the pots themselves.

    Pros

    • Famous Japanese maker
    • Vintage, one-of-a-kind pieces
    • Already in the US (at these listings)

    Cons

    • Expensive for the size
    • Single pieces sell quickly

    Best for: collectors and growers with a finished tree that deserves the best.

    Check vintage Bigei pots at Bonsai Outlet


    Which small bonsai pot should you buy? (By situation)

    You’re just starting with small trees: inexpensive pots from Herons, or Korean and Chinese pots at Wigert’s.

    You’re in the US and want handmade pots on a budget: Miju pots or etched shohin pots at Wigert’s.

    You want a Japanese-made pot without collector prices: Wazakura’s Banko and Tokoname series.

    You want to compare many named Japanese makers: Bonsai Plaza.

    You want one carefully chosen mame pot: bonsaipots.eu.

    You have a finished tree and want a collector piece: vintage Bigei.

    You just want to browse quickly: you can also search mame bonsai pots on Amazon, though origin and quality vary widely, so read listings carefully.


    How to choose the right small pot for your tree

    Glazed or unglazed?

    A common rule of thumb is that unglazed pots suit conifers like pines and junipers, while glazed pots suit deciduous, flowering and fruiting trees, where the glaze color can echo leaves, flowers or fruit. It’s a guideline, not a law. The Shozan pot above is a good example of glaze matched to autumn color.

    Size and depth

    A pot that’s slightly too big tends to look better on a small tree than one that’s too small, and it’s easier to keep watered. Very shallow mame pots look elegant, but they hold very little soil.

    Shape

    Rounded and soft shapes often suit gentle, informal trees. Rectangles and strong angles often suit trees with powerful trunks. Cascade pots are tall and narrow for trees that hang down.

    Interior measurements

    With small pots, the inside dimensions matter more than the outside. Thick walls can make a pot look bigger than its usable space. Shops like Wigert’s and bonsaipots.eu list interior measurements, which helps.


    Caring for trees in small pots

    Small pots don’t leave much buffer, so a few habits make a big difference.

    Check water daily, sometimes more. In summer heat, small pots can dry out much faster than larger ones. One Bonsai Nut member notes that large training pots dry more slowly than small bonsai pots.

    Use shade and shelter in hot weather. Bonsai Nut members mention shade cloth, partial shade and top dressings like moss to slow drying.

    Consider an automatic system if you travel. Our automatic watering guide covers timers and drip kits.

    Feed regularly. Bonsai Empire notes that smaller pots need more regular fertilizing, too.

    Repot carefully. With so little room, the root ball needs to be handled gently and tied in firmly.

    In my experience, the people who succeed with mame and shohin aren’t necessarily the most skilled. They’re the ones who check their trees every day.


    Displaying small bonsai

    Small bonsai are often displayed in groups on tiered stands, which is part of their appeal. A good pot really shines here, because it’s seen up close and next to other pots. Our bonsai display stands guide covers options from simple tables to Japanese jita boards.

    When you display several small trees together, varying pot colors and shapes can make the group more interesting. A glazed pot next to an unglazed one, a round pot next to a rectangle.


    Common small-pot mistakes

    Moving a tree into a small pot too early. Growth slows dramatically.

    Choosing by photo alone. Check dimensions, especially interior measurements.

    Ignoring drainage. A tiny hole in a tiny pot can clog.

    Forgetting about tie-down. If there’s no way to secure the tree, it will move.

    Leaving small pots in full midsummer sun without checking them. They can dry out quickly.


    Conclusion: start small, then buy one special pot

    Mame and shohin bonsai pots range from a few pounds to several hundred dollars, and the right choice depends on the tree’s stage and how much the pot matters to you.

    For most growers, a mix works best. Start with affordable pots from Herons or Wigert’s for trees still developing. Move to Japanese-made pots from Wazakura, Bonsai Plaza or bonsaipots.eu as your trees improve. And save a collector piece like a vintage Bigei for the tree you’re proudest of.

    Whatever you choose, remember that small pots need daily attention. Get the watering right, and a small tree in a good pot can be one of the most rewarding things in bonsai.

    Ready to find your pot? Browse shohin pots at Bonsai Plaza, or check Korean pots by Miju at Wigert’s.

  • Best Bonsai Training Pots: 6 Options for Faster Growth and Better Roots

    Best Bonsai Training Pots: 6 Options for Faster Growth and Better Roots

    Affiliate disclosure: Some links on this page are affiliate links. If you buy through them, Aribonsai may earn a small commission at no extra cost to you. It doesn’t change what we recommend or how we rank anything.


    Why your young tree shouldn’t be in a beautiful pot yet

    When most people picture bonsai, they picture a small tree in an elegant, shallow ceramic pot. That’s the finished look. But most bonsai don’t spend their early years in pots like that.

    Young trees, pre-bonsai and freshly collected material usually grow in bonsai training pots: plastic containers, simple clay pots, colanders, mesh baskets and wooden boxes. They’re cheap, practical and often deeper or wider than a display pot. Their job isn’t to look good. It’s to help the tree grow faster and build a dense, healthy root system that will one day fit comfortably into a shallow bonsai pot.

    Putting a young tree straight into a small, shallow display pot is one of the most common beginner mistakes. Growth slows, trunks thicken very slowly, and roots have little room to develop.

    The challenge is choosing among training pots. Plastic, clay, colanders, air-pruning pots, nursery flats, mica: each has strengths and weaknesses, and experienced growers often disagree.

    In my experience, the best training pot is the one that matches the tree’s stage and your watering habits. A pot that dries out fast is great in a cool climate and a problem in a hot one. This guide explains what matters, then compares six types of bonsai training pots, from cheap plastic to air-pruning pots.


    Who this bonsai training pots guide is NOT for

    It’s not about display pots. For finished trees, our Japanese bonsai pots guide covers Tokoname makers.

    It’s not for trees in the ground. Field growing is another way to develop trunks fast, but it’s a different method.

    It’s not a repotting tutorial. We’ll touch on technique, but focus on the containers.

    Still with us? Let’s go.


    How we picked these (3 things that actually matter)

    1. Root development

    The main reason to use a training pot is to build a better root system.

    On bonsai forums, many growers report that colanders, mesh baskets and air-pruning pots encourage fine, fibrous roots instead of long, circling ones. Roots that reach the air at the edge of the container stop growing there and branch, creating a denser root mass that’s easier to fit into a bonsai pot later. Most forum members consider air pots better than standard nursery pots for growing roots.

    2. How fast it dries out

    The same open sides that help roots also dry the soil faster. Forum members warn that mesh baskets dry out quickly, especially with inorganic soil, and that air pots need more watering attention. Solid plastic and clay pots hold moisture longer.

    If you live somewhere hot, can’t water often, or grow moisture-loving trees like maples, choose a pot that dries more slowly. One forum member notes that air baskets dry out more slowly than pond baskets, which suits maples.

    3. Cost, size and durability

    You’ll often need many training pots, in several sizes, and you’ll replace them as trees grow. Cheap, durable pots in a range of sizes are ideal. Very large trees and collected material may need big, shallow containers, which can be expensive unless you choose nursery flats or build wooden boxes.

    A few training pot habits that matter more than the pot

    None of these cost anything.

    • Use free-draining bonsai soil. Our akadama guide covers good mixes.
    • Water more often in open pots. Colanders and air pots dry fast.
    • Don’t bury mesh pots in the ground. Forum members warn roots grow through and bind the mesh into the root mass.
    • Tie trees in firmly. Movement tears new roots.
    • Match pot size to the tree’s stage. Bigger for growth, smaller as you refine.
    • Repot on schedule. Even good training pots fill up eventually.

    Bonsai training pots comparison table

    Pot typeExampleBest forDries outApprox. price
    Plastic training potsPöppelmann (Germany) at Wigert’sMost pre-bonsaiModerately~$2 and up per pot
    High-fired clay training potsBonsai TonightA step toward bonsai potsModerately~$2.80–115 each
    Colanders and mesh basketsKitchen colanders, pond basketsFibrous roots, fast developmentFastLow
    Nursery flatsAnderson FlatsDeveloping nebari, collected treesModeratelyLow to moderate
    Air-pruning potsRootmakerRoot development in warm climatesFastModerate
    Mica potsWigert’s mica potsTraining pots that look like ceramicModeratelyModerate

    Prices are approximate and vary by size, quantity and retailer. Always check current prices.


    The 6 best bonsai training pot options, reviewed

    1. Pöppelmann plastic training pots – the reliable everyday choice

    If you need a dependable, affordable training pot for most young trees, plastic is the place to start.

    Wigert’s Bonsai sells plastic training pots made by Pöppelmann in Germany, described as quality plastic training pots for pre-bonsai training. Sizes range from 6 inches across and 2¾ inches deep up to 13¼ inches across and 5½ inches deep. They’re sold singly or in sets of 5 or 10, with prices from about $2 up to $85 depending on size and quantity.

    Plastic is light, cheap, durable and holds moisture better than mesh, which makes it forgiving for beginners and hot climates.

    Pros

    • Affordable, especially in sets
    • Wide range of sizes
    • Light and durable
    • Holds moisture well

    Cons

    • Less root air-pruning than mesh or air pots
    • Plain look
    • Colors vary

    Best for: most pre-bonsai and young trees.

    Check Pöppelmann training pots at Wigert’s Bonsai


    2. High-fired clay training pots – a step toward bonsai pots

    High-fired clay training pots sit between a plastic pot and a finished bonsai pot. They’re sturdier and more attractive than plastic, but inexpensive enough to use for development.

    Bonsai Tonight sells high-fired training pots in a wide range of sizes, from about 3¾ × 1½ inches up to 18¼ × 7½ inches, sold in bundles. Prices range from about $2.80 each for the smallest to about $115 each for the largest. They’re available for local pickup only from that store.

    Clay pots are heavier and more stable than plastic, which helps with top-heavy trees, and their more traditional shape suits trees in later development.

    Pros

    • More stable and attractive than plastic
    • Very wide size range
    • Good value in bundles

    Cons

    • Heavier
    • Local pickup only at this retailer
    • Can break if dropped

    Best for: trees in later development, and growers near the store.

    Check high-fired training pots at Bonsai Tonight


    3. Colanders and mesh baskets – the cheap route to fibrous roots

    Many bonsai growers use ordinary kitchen colanders or pond baskets as training pots.

    On Bonsai Nut, growers report that mesh baskets encourage fibrous root systems through air pruning. One said every tree he repotted from them was completely filled with fibrous roots, and they prevent the long, circling roots common in regular containers. Inexpensive colanders from Asian supermarkets or IKEA are popular, and some growers make DIY baskets from plastic canvas. Colanders have been used for pines, too.

    The trade-off is watering. They dry out quickly, especially with inorganic soil. And forum members advise against putting them in the ground, because roots grow through and bind the mesh into the root mass.

    Pros

    • Very cheap
    • Encourage fine, fibrous roots
    • Widely available

    Cons

    • Dry out quickly
    • Results vary between growers
    • Not for planting in the ground

    Best for: fast root development in cooler climates, and growers who can water often.

    Search plastic colanders on Amazon


    4. Anderson Flats – best for nebari and collected trees

    Anderson Flats are shallow, square nursery containers, and they’re a favorite for developing surface roots (nebari).

    On Bonsai Nut, one grower calls Anderson flats great for bonsai in development, and another says they suit collected trees. The “Flat Five” is about 14 × 14 × 5.5 inches. A forum member notes that Anderson trays have a grid bottom that helps develop nebari.

    Their wide, shallow shape encourages roots to spread outward rather than down, exactly what you want for a broad, attractive root base.

    Pros

    • Wide, shallow shape for nebari
    • Grid bottom
    • Good for collected trees
    • Affordable for the size

    Cons

    • Square, utilitarian look
    • Large sizes take up bench space

    Best for: developing nebari and growing collected or larger trees.

    Search Anderson Flats on Amazon


    5. Rootmaker air-pruning pots – the hard-sided air pot

    Air-pruning pots are designed specifically to stop circling roots. Their sides have openings that let roots reach the air, where they stop and branch.

    In a Bonsai Nut discussion, members say air pots produce denser, more fibrous root systems than standard nursery pots, and hard-sided Rootmaker-style pots were the most favored option, followed by net fabric bags. One member notes Rootmaker pots have fewer side holes and need watering less often than mesh baskets. The same discussion stresses that results depend heavily on soil, watering and feeding, and one poster notes some science disputes whether air pots improve top growth.

    Some air pots cost over $8 each, so they’re best used selectively.

    Pros

    • Designed to prevent circling roots
    • Hard sides are durable
    • Fewer side holes than mesh, so less frequent watering

    Cons

    • More expensive than plastic or colanders
    • Still dry faster than solid pots
    • Results depend on soil and care

    Best for: serious growers developing trees for the long term.

    Search Rootmaker air pruning pots on Amazon


    6. Mica pots – training pots that look like ceramic

    Sometimes you want a training pot that doesn’t look like one, especially for a tree you display while it develops.

    Wigert’s sells mica pots in rectangular, oval and drum shapes. A Bonsai Nut member says they “pass for ceramic at 10 feet,” and suggests sanding the edges with 220-grit sandpaper and fine steel wool to make them look even more like ceramic.

    Mica pots are lighter and more durable than ceramic, so they’re a good compromise for trees that are developing but also on show.

    Pros

    • Looks like ceramic from a distance
    • Lighter than ceramic
    • Several shapes
    • Durable

    Cons

    • More expensive than plastic
    • Edges may need finishing

    Best for: developing trees that are also on display.

    Check mica pots at Wigert’s Bonsai


    Which bonsai training pot should you buy? (By situation)

    You have a few young trees and want a simple start: Pöppelmann plastic training pots.

    Your trees are close to bonsai pots: high-fired clay training pots.

    You want fibrous roots cheaply and can water often: colanders or mesh baskets.

    You’re developing nebari or collected trees: Anderson Flats.

    You want the best root development long-term: Rootmaker air-pruning pots.

    Your developing tree is also on display: mica pots.

    You live somewhere hot and dry: plastic or clay, which hold moisture longer.

    A practical progression

    Many growers move trees through stages: colander or air pot for fast root growth, then a plastic or clay training pot, then a shallow Japanese display pot when the tree is refined. Each step gets shallower and smaller as the root system becomes denser.


    How big should a training pot be?

    There’s no single right size, but a few simple rules help.

    For growth, go a little bigger. A tree that’s still building its trunk and branches needs room for roots. A training pot somewhat larger than the current root ball gives it space to grow without leaving a huge volume of soil that stays wet in the middle.

    Don’t jump too far at once. A small root ball in a very large pot can sit in soggy soil, because the roots can’t use all that water. Moving up gradually is usually safer than going straight to the biggest pot you own.

    Go shallower as you refine. As the trunk gets close to the size you want, you’ll start reducing roots and moving into shallower containers. That’s when wide, shallow options like Anderson Flats start to make more sense than deep pots.

    Think about your bench space. Training pots add up fast. Ten young trees in mid-size pots take up a lot more room than you’d expect, so plan your layout before you buy a set.

    In my experience, the most useful habit is simply writing down when each tree went into its pot. It sounds small, but it makes it much easier to know when a tree is due for a check, especially once you have more than a handful.

    If you’re buying young material to fill those pots, our guide to where to buy bonsai trees online covers nurseries that sell pre-bonsai.


    Wooden boxes: the DIY option for big trees

    For very large or collected trees, training pots in the right size can be hard to find or expensive. Many growers build simple wooden boxes instead. On Bonsai Nut, one grower says building boxes to the exact size needed is more cost-effective than buying a huge pot for a few years of use.

    Use untreated, rot-resistant wood if possible, drill plenty of drainage holes, and add tie-down holes before you plant.


    How to repot into a training pot

    1. Choose the right size, larger than the root ball for growth.
    2. Cover drainage holes with mesh. Our bonsai repotting supplies guide covers what you need.
    3. Thread tie-down wire through the pot.
    4. Comb out the roots gently. A bonsai root rake helps.
    5. Position and tie in the tree.
    6. Fill with free-draining soil, working it in with a chopstick.
    7. Water thoroughly, and keep a close eye on watering in open pots.

    Common bonsai training pot mistakes

    Putting young trees in small display pots too early. Growth slows dramatically.

    Underwatering colanders and air pots. They dry fast.

    Burying mesh pots in the ground. Roots grow through the mesh.

    Using heavy garden soil. Roots need free-draining bonsai soil.

    Leaving trees too long without repotting. Even training pots fill up.


    Conclusion: the right pot for the right stage

    Bonsai training pots aren’t glamorous, but they’re where most bonsai are really made. They let young trees grow faster and build the dense, fibrous root systems that make a beautiful bonsai possible later.

    For most growers, plastic training pots like Pöppelmann’s are the simplest start. Colanders and air-pruning pots are excellent for root development if you can water often, Anderson Flats suit nebari and collected trees, and mica or clay training pots bridge the gap to display pots.

    Match the pot to the tree’s stage and your climate, water carefully, and move trees toward shallower pots as their roots improve.

    Ready to grow? Check Pöppelmann training pots at Wigert’s, or search Anderson Flats on Amazon.

  • Best Bonsai Trimming Scissors: 6 Japanese Bud and Leaf Scissors for Fine Work

    Best Bonsai Trimming Scissors: 6 Japanese Bud and Leaf Scissors for Fine Work

    Affiliate disclosure: Some links on this page are affiliate links. If you buy through them, Aribonsai may earn a small commission at no extra cost to you. It doesn’t change what we recommend or how we rank anything.


    When your everyday shears are too big

    Most bonsai growers start with one pair of scissors: a classic satsuki-style shear that handles everyday pruning. It’s the right first tool. But as trees mature, the work changes.

    On a developed tree, you’re no longer cutting long shoots in open space. You’re removing a single bud deep inside a dense pad. Thinning needles on a white pine. Cutting individual leaves on a maple without nicking the one next to it. Snipping tiny shoots on a shohin tree barely the size of your hand.

    That’s where bonsai trimming scissors come in. These are smaller, finer scissors with short, narrow blades designed to reach into tight spaces and make precise cuts. Japanese makers produce many variations: bud scissors, twig scissors, scissors made for specific species like Japanese white pine, and tiny shohin scissors.

    They’re not a replacement for your main shears. They’re the tool you reach for when precision matters more than power.

    In my experience, the moment growers buy their first pair of fine trimming scissors is usually the moment their trees start to look refined rather than just healthy. This guide explains what matters, then compares six Japanese bonsai trimming scissors, from budget bud scissors to premium Masakuni.


    Who this bonsai trimming scissors guide is NOT for

    It’s not for your first pair of scissors. If you’re starting out, a general satsuki-style pair is more versatile. Our bonsai shears guide covers those.

    It’s not for cutting branches or roots. Fine scissors are easily damaged by thick wood. Use a concave cutter or root cutter instead.

    It’s not for cutting wire. Never use fine scissors on wire.

    Still with us? Let’s go.


    How we picked these (3 things that actually matter)

    1. Blade length and tip shape

    Short, narrow blades reach into dense foliage without disturbing the surrounding growth. Kaneshin’s fine trimming scissors, for example, have blades of about 1.8 inches, and its white pine scissors have blades of about 1.2 inches. Longer, slimmer blades, like those on twig scissors, reach further into a tree.

    Sharp, fine tips let you isolate a single bud or leaf.

    2. Cutting capacity

    Fine scissors are built for precision, not force. Niwaki notes that Kaneshin’s trimming scissors are limited to cuts of about 6–8 mm. Cutting thicker material can spring the blades or chip the edge.

    If you regularly need to cut thicker shoots, keep your everyday shears or a concave cutter for that job.

    3. Steel and weight

    As with other Japanese tools, you’ll see carbon steel, Yasugi specialty steel and stainless steel. Carbon and Yasugi steels take a fine edge; stainless is more forgiving in humid conditions. Our stainless vs carbon steel guide explains the trade-offs.

    Weight matters too. Fine trimming can take hours on a large tree, and lighter scissors reduce hand fatigue.

    A few fine-trimming habits that matter more than the scissors

    None of these cost anything.

    • Use the tips for fine cuts and the blade base for slightly heavier cuts. Niwaki gives this advice for Kaneshin’s white pine scissors.
    • Never twist the blades. Twisting springs fine scissors.
    • Stay within capacity. If it doesn’t cut cleanly, use a bigger tool.
    • Clean sap often. Pine and juniper sap gum up fine blades quickly.
    • Oil after every session. A light coat of camellia oil prevents rust. Our bonsai tool maintenance guide covers the essentials.
    • Store them separately. Fine tips are easily bent if they knock against heavier tools.
    • Combine with tweezers. For removing needles and tiny buds, tweezers often work alongside scissors.

    Bonsai trimming scissors comparison table

    ScissorsTypeBlade / sizeSteelOriginApprox. price
    Kaneshin Bonsai Trimming ScissorsFine bud trimming7.1 in overall, 1.8 in bladesCarbonJapan~$66
    Kaneshin Goyoumatsu Scissors (No.32)White pine scissors6.1 in, 1.2 in bladesCarbonJapan~$52
    Wazakura Yasugi Steel Twig ScissorsTwig scissors21 cm, 5.2 cm bladesYCS3 Yasugi steelSanjo, Japan~£40 (UK)
    Masakuni Bud Trimming Shears (S)Premium bud shears160 mm, 90 gStainlessJapan~€138 (EU)
    Tsuyomitsu Bud ScissorsBudget bud scissors155 mm, 47 gSteel or stainlessJapan~€25–30 (EU)
    Tsuyomitsu Universal 120 mm ScissorsShohin scissors120 mm, ~40 gBlack steel or stainlessJapan~€30–40 (EU)

    Prices are approximate and vary by retailer and country. Always check current prices before buying.


    The 6 best bonsai trimming scissors, reviewed

    1. Kaneshin Bonsai Trimming Scissors – the best all-round fine scissors

    If you want one pair of fine scissors to go alongside your main shears, this is an excellent choice.

    Niwaki describes Kaneshin’s trimming scissors as designed for fine trimming of buds and small branches, especially in dense, hard-to-reach areas of mature bonsai. They’re about 7.1 inches long with 1.8-inch blades, made in Japan from carbon steel, weigh about 3.6 oz, and cost around $66. Cuts are limited to about 6–8 mm.

    They’re compact enough to reach inside a tree, but still comfortable for longer sessions.

    Pros

    • Designed for buds and fine shoots in dense foliage
    • Made in Japan by Kaneshin
    • Short, precise blades
    • Comfortable size

    Cons

    • Limited to small cuts (about 6–8 mm)
    • Carbon steel needs drying and oiling

    Best for: growers refining mature trees with dense foliage.

    Check the Kaneshin Bonsai Trimming Scissors at Niwaki


    2. Kaneshin Goyoumatsu Scissors (No.32) – best for Japanese white pine

    Japanese white pine (goyomatsu) is one of the most prized bonsai species, and Kaneshin makes scissors specifically for it.

    The No.32 is a compact carbon steel scissor, made in Japan, about 6.1 inches long with 1.2-inch blades. Niwaki describes it as designed specifically for Japanese white pines, and suited to detailed work like trimming green growth, removing small buds and thinning crowded foliage. It suggests using the blade base for heavier cuts and the tips for finer work. It costs around $52.

    The short blades are ideal for working between dense clusters of needles without cutting the ones you want to keep.

    Pros

    • Designed for Japanese white pine
    • Very short, precise blades
    • Made in Japan
    • Useful for other fine conifer work too

    Cons

    • Specialized
    • Short blades are slow on larger trees

    Best for: white pine growers and anyone doing fine conifer work.

    Check the Kaneshin Goyoumatsu Scissors at Niwaki


    3. Wazakura Yasugi Steel Twig Scissors – best for reaching deep into a tree

    Twig scissors have long, slim handles and narrow blades, giving you reach into the center of a tree.

    Wazakura’s twig scissors are handcrafted in Sanjo, Niigata, a region known for metalworking, from YCS3 Yasugi specialty steel. They’re 21 cm long with 5.2 cm blades. Made In Japan UK describes them as designed for precise pruning and detailed maintenance, especially trimming twigs, shoots, leaves and fine branches. They’re around £40, though they were sold out at that retailer when we checked.

    The longer reach is a real advantage on medium and larger trees, where short scissors can’t get to the inner growth.

    Pros

    • Handcrafted in Sanjo, Japan
    • Yasugi specialty steel takes a fine edge
    • Long reach into dense trees
    • Good value for the steel

    Cons

    • Stock varies
    • Longer blades are less nimble on tiny shohin

    Best for: medium and large trees with dense interiors.

    Shop Wazakura twig scissors

    *Tip: Use code **ARIBONSAI** at checkout for 10% off at Wazakura.*


    4. Masakuni Bud Trimming Shears (S) – the premium pick

    If you want the finest bud trimming scissors money can buy, Masakuni is the name most collectors think of.

    Bonsai.de lists Masakuni’s Bud Trimming Shears (S) at 160 mm long and 90 g, made from high-grade stainless steel, for around €138. That makes them light, rust-resistant and built to Masakuni’s well-known standards.

    They’re expensive for fine scissors. But for a collector who spends many hours refining trees, a premium, lightweight stainless pair can be a real pleasure to use. If you’re weighing the two big brands, our Kaneshin vs Masakuni comparison covers their differences across tool types.

    Pros

    • Premium Masakuni quality
    • Lightweight stainless steel
    • Rust-resistant, low maintenance

    Cons

    • Expensive
    • Harder to find outside Europe and Japan

    Best for: collectors and advanced growers who want a premium tool.

    Check Masakuni Bud Trimming Shears at Bonsai.de


    5. Tsuyomitsu Bud Scissors – best budget Japanese option

    You don’t have to spend a lot to get good Japanese bud scissors.

    Bonsai.de sells Japanese-made bud scissors from Tsuyomitsu, 155 mm long. The steel version weighs just 47 g, with a 28 mm cutting surface, for around €25. A stainless steel version (65 g, 30 mm cutting surface) costs around €30.

    They’re light, simple and inexpensive, a great way to try fine trimming scissors before investing in a premium pair.

    Pros

    • Very affordable
    • Made in Japan
    • Very light
    • Steel and stainless options

    Cons

    • Less refined than Kaneshin or Masakuni
    • Mainly available in Europe

    Best for: budget-conscious growers trying fine scissors for the first time.

    Check bud scissors at Bonsai.de


    6. Tsuyomitsu Universal 120 mm Scissors – best for shohin

    On a shohin or mame tree, even standard fine scissors can feel large. These tiny scissors are made for that scale.

    Bonsai.de lists 120 mm universal bonsai scissors in black steel (about 42 g, around €30) and in stainless steel made in Japan by Tsuyomitsu (about 40 g, around €40). The retailer describes them as suited to delicate work such as on shohin trees.

    Bonsai.de also sells a tiny tweezer-shaped leaf trimmer for removing small leaves or needles from a branch, which can be a useful companion.

    Pros

    • Tiny and precise, ideal for shohin and mame
    • Very light
    • Stainless option made in Japan

    Cons

    • Too small for larger trees
    • Mainly available in Europe

    Best for: shohin and mame growers.

    Check shohin scissors at Bonsai.de


    Which bonsai trimming scissors should you buy? (By situation)

    You want one pair of fine scissors for most trees: Kaneshin Bonsai Trimming Scissors.

    You grow Japanese white pine: Kaneshin Goyoumatsu Scissors.

    You need reach into the center of larger trees: Wazakura Yasugi Steel Twig Scissors.

    You want the best and don’t mind paying: Masakuni Bud Trimming Shears.

    You’re on a budget: Tsuyomitsu Bud Scissors.

    You grow shohin or mame: Tsuyomitsu Universal 120 mm Scissors.

    A sensible scissor kit

    Most growers who refine trees regularly end up with three scissors: an everyday satsuki-style shear, one pair of fine trimming scissors, and possibly a species-specific or shohin pair. Add fine bonsai tweezers for plucking needles and tiny buds, and you’re equipped for most refinement work.


    Trimming scissors vs satsuki shears: what’s the difference?

    It’s a fair question, since both are small Japanese bonsai scissors. The difference is in what they’re designed to do.

    Satsuki-style shears are the all-rounders. They usually have longer blades and larger handles, and they’re built to handle everyday pruning: cutting back shoots, trimming foliage, cutting small branches and even fine roots. Kaneshin’s No.40E bonsai scissors, for example, are described by one UK retailer as general-purpose shaping scissors for leaves, buds and smaller branches on medium to large bonsai, and fine roots on bonsai of any size.

    Bonsai trimming scissors, including bud and twig scissors, are specialists. Their blades are shorter, narrower or longer-reaching, and their tips are finer. They sacrifice some strength and versatility for precision, so they’re better for isolating a single bud, cutting leaves on a dense pad or working on tiny shohin trees.

    In practice, most growers use both. The satsuki shear does the bulk of the cutting, and the fine trimming scissors handle the detailed refinement. If you only own one pair, make it a satsuki-style shear first, then add trimming scissors once your trees reach the refinement stage.


    When to use bonsai trimming scissors

    Fine scissors come into their own at specific times of the year, depending on species:

    • Spring and early summer: cutting back new shoots and removing unwanted buds on deciduous trees.
    • Summer: leaf cutting and leaf trimming on suitable deciduous species.
    • Late summer and autumn: thinning and refining conifers, including pines.
    • Year-round on indoor trees: trimming new growth on tropical species to keep them compact.

    Timing varies by species and climate, so always check what your tree needs before heavy trimming.


    How to care for fine trimming scissors

    • Wipe off sap after every use, especially from pines and junipers.
    • Dry the blades completely.
    • Oil the blades and joint lightly.
    • Remove rust early with a rust eraser.
    • Hone carefully. Fine edges need gentle sharpening; consider professional sharpening for premium scissors.
    • Store them in a tool roll so the tips stay aligned.

    Common mistakes with bonsai trimming scissors

    Cutting branches that are too thick. Fine scissors chip or spring.

    Twisting the blades in a cut. It damages the alignment.

    Using them on roots. Grit dulls fine edges quickly.

    Leaving sap on the blades. It hardens and makes cuts ragged.

    Dropping them. Fine tips bend easily.


    Conclusion: precision is what makes a tree look refined

    Bonsai trimming scissors aren’t your first tool, but they’re often the tool that takes your trees from healthy to refined. Short, fine blades let you remove exactly the bud, leaf or shoot you want, and nothing else.

    For most growers, Kaneshin’s trimming scissors are the best all-round choice. White pine growers will love the Kaneshin Goyoumatsu scissors, and Wazakura’s Yasugi twig scissors offer great reach and value. If you want the best, Masakuni’s bud shears are a premium treat, and Tsuyomitsu offers good budget and shohin options.

    Use them within their capacity, keep them clean and oiled, and they’ll serve you for years. Fine scissors reward care: a well-kept pair will still make crisp, clean cuts long after a neglected one has gone dull, and every tree you refine with it will show the difference.

    Ready to refine your trees? Check the Kaneshin Bonsai Trimming Scissors at Niwaki, or shop Wazakura twig scissors*Tip: Use code **ARIBONSAI** at checkout for 10% off at Wazakura.*